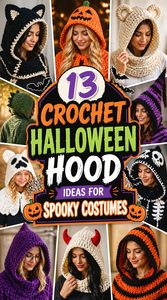
A crochet hood can do far more for a Halloween costume than simply keep your head covered. The face opening, crown shape, ears, horns, neck coverage, and fabric density can turn essentially the same accessory category into a skeleton mask, devil bonnet, woodland animal, wizard hood, or dramatic cape.
These 13 ideas deliberately cover different constructions rather than repeating one balaclava in different colors. Some tutorials are overtly Halloween-themed, while others provide useful hood, cowl, cape, or scoodie foundations that can be styled for a specific costume. The comparisons below focus on fit, visibility, structure, movement, and embellishment placement so you can choose a hood that works with the rest of your outfit rather than treating the headpiece as an afterthought.
Quick List
- Crochet Spiderweb Mesh Balaclava Hood
- Crochet Skull Balaclava Hood
- Crochet Devil-Horn Bonnet Hood
- Crochet Cat-Ear Balaclava Hood
- Crochet Long-Ear Bunny Balaclava Hood
- Crochet Bear Spirit Hood
- Crochet Fox Hooded Cowl
- Crochet Granny-Square Patchwork Balaclava Hood
- Crochet Pointed Wizard Hood
- Crochet Red Riding Hood Cape
- Crochet Witchy Hooded Pocket Scarf
- Crochet Rounded Woodland Hooded Scarf
- Crochet Granny-Square Scarecrow Scoodie
Choose the Face Opening Before the Costume Details
The face opening changes both the appearance and practicality of a Halloween hood. A close balaclava can make a skull or creature costume feel integrated because the crochet follows the head closely. A roomy wizard or cape hood creates a completely different effect, allowing the fabric to frame the face and cast deeper folds around it.
Before settling on decorative details, check how much peripheral vision the finished shape leaves and whether the edge stays where you want it when you turn your head. Glasses, makeup, wigs, and masks may all require more room. For children or anyone wearing a hood in a crowded setting, prioritize unobstructed vision and comfortable breathing over an especially tight or dramatic opening. Fit, structure, closure, and practical wearability are more useful planning checks than choosing the costume by color alone.
Yarn Structure Changes Ears, Horns, Points, and Drape
Halloween hoods often depend on silhouette. Cat ears need enough definition to remain recognizable, a wizard point should not disappear completely into the crown, and a cape hood generally looks better when it can fall into soft folds.
That means the most suitable yarn is not automatically the thickest one. Dense fabric tends to support sculptural details better, but it can also make a full hood heavier and warmer. Looser or mesh fabric creates movement and works especially well for spiderweb, spectral, or layered looks, although it offers less support for attached pieces. When changing yarn from a tutorial, compare the resulting fabric and measurements rather than relying only on the yarn-weight label. If the design contains separate ears, horns, or other embellishments, check their placement on the completed hood before attaching them permanently.
Plan Closures and Neck Coverage Around the Costume
A balaclava, bonnet, cowl, scoodie, and cape behave differently once you start moving. A bonnet with ties can stay visually centered while leaving the lower neck exposed. A hooded cowl adds neck coverage without long scarf ends. Hooded scarves add styling options but introduce fabric that must be arranged around coats, bags, props, or costume pieces.
Try to think about the entire outfit before finishing the hood. A dramatic chest panel may compete with a bulky cowl, while a simple black outfit can benefit from a larger hooded scarf. Long ties and hanging ends should be positioned so they do not interfere with walking, doors, props, or other accessories. For children’s costumes, keep loose attachments and decorative pieces appropriate to the wearer and intended setting.
1. Crochet Spiderweb Mesh Balaclava Hood
 SAVE
This crochet spiderweb hood combines a close head covering with open mesh, creating one of the most distinctly Halloween-looking silhouettes in the collection. Instead of relying on an appliqué to provide the theme, the web-like fabric itself becomes the costume detail. The tutorial presents the finished piece as a spiderweb or chainmail-style hood, so it can lean toward spider costume, haunted armor, ghostly chainmail, or dark fantasy styling.
Because the fabric is intentionally open, this choice feels visually lighter than a solid skull or animal balaclava. That makes it useful when you want a recognizable headpiece without completely hiding hair or the layers underneath.
Open Mesh Makes the Hood Part of the Costume
A solid black hood can disappear against a dark shirt, but spiderweb mesh creates visible negative space. Think about what will show through those openings. A pale underlayer makes the web structure easier to read, while another dark layer produces a subtler effect.
That contrast matters more than adding many extra embellishments. Before committing to the rest of the costume, view the hood against the clothing you plan to wear and make sure the web pattern remains visible from several feet away.
Check the Opening After the Fabric Stretches
Mesh can respond differently to wear than dense crochet. Once the hood is on the head, openings may widen and the face edge may move from its unstretched position.
Use the completed shape as the fitting checkpoint rather than judging only from a flat piece. Make sure the crochet does not drift into the eyes when the wearer turns their head. If the Halloween look depends on makeup around the eyes, leave enough clearance that the yarn does not constantly rub against that area.
Keep Additional Spider Details Lightweight
The web texture is already a strong focal point. Large attached spiders, beads, or dangling decorations can make the surface harder to read and may pull on an intentionally open fabric.
If you want an extra spider motif, place it where the mesh has enough support and confirm that it does not distort the face opening. A restrained accent can reinforce the idea without turning the hood into a heavy decorated cap.
2. Crochet Skull Balaclava Hood
 SAVE
For a more graphic Halloween piece, the skull balaclava places the recognizable motif directly across the face area. The close-fitting base gives the design a mask-like quality, while the contrasting skull structure creates a much stronger character than a plain ski-mask shape. Alexandria Masse’s tutorial specifically demonstrates a crochet skull balaclava and shows the finished costume effect clearly.
This is a good option when the hood itself needs to carry most of the costume. It can work with a simple dark outfit because the face treatment provides the visual focus, but the close fit also makes careful eye-opening placement especially important.
Eye Placement Matters More Than Perfect Symmetry
A skull motif can look balanced on a table and still feel wrong when worn if the openings do not line up naturally with the wearer’s eyes. Treat the finished wearable fit as the deciding factor.
Before permanently securing decorative layers, check the hood while it is being worn. Confirm that the eye area gives clear vision and that stretching the balaclava does not pull the skull details noticeably away from their intended position.
Contrast Determines How Clearly the Skull Reads
The skull needs enough visual separation from the balaclava underneath. High contrast creates an immediate skeleton effect, while closer values can make the design quieter and more gothic.
Think beyond classic black and white. A dark base with bone, gray, muted green, or another contrasting skull tone can still read effectively. What matters is whether the major facial shapes remain distinguishable once the hood is stretched over the head.
Decorative Layers Need Secure, Flat Finishing
Raised edges around the face can catch more easily than embellishments placed on a flat hat. Any attached skull components should sit securely against the base instead of flapping outward.
After finishing, inspect the inside as carefully as the exterior. Loose yarn ends or bulky joins around the forehead and cheeks can be annoying during extended wear. The most successful costume hood is one that still feels comfortable after the first few photographs.
Original Tutorial and Creator Credit
Creator: Alexandria Masse
3. Crochet Devil Horn Bonnet Hood
 SAVE
A devil bonnet creates a very different Halloween profile from the full-face balaclavas. The face remains open while horn shapes rise from the crown, and ties under the chin give the piece an intentionally bonnet-like outline. The ITSMEFEDI tutorial is specifically devoted to a crochet devil bonnet, making it a close source match for this costume idea.
This construction suits someone who wants strong Halloween character without covering the mouth, cheeks, or most of the face. It also leaves more room for makeup. The trade-off is that horn placement becomes highly visible, so their angle and balance deserve more attention than they would on a loose, heavily textured hood.
Horn Angle Changes the Character
Horns that point upward can make the bonnet feel playful and graphic, while more outward or backward angles can create a sharper fantasy profile. Decide on the impression before permanently securing them.
Pin or temporarily position the horns and view the hood from the front, side, and back. A placement that looks centered from the front may appear uneven in profile. Checking multiple angles is much easier than removing firmly attached crochet pieces later.
Bonnet Ties Give You a Different Fit Check
Unlike a balaclava that relies on stretch around the head, a bonnet can shift depending on how the ties are handled. Make sure the crown fits correctly before using the ties to compensate for a loose hood.
The ties should help position the piece, not pull the whole face edge out of shape. Try the bonnet with the hairstyle, wig, or ears you plan to wear on Halloween because added volume underneath can noticeably change how the crown sits.
Keep Horns Proportional to the Base
Large horns can look dramatic, but they also create more leverage on their attachment points. A relatively soft bonnet may not support oversized pieces the way a denser hat would.
If you modify the tutorial, increase horn scale cautiously and evaluate whether the base still holds its intended shape. A smaller horn that stays upright usually communicates the design more clearly than a larger one that collapses or twists.
Original Tutorial and Creator Credit
Creator: ITSMEFEDI
4. Crochet Cat Ear Balaclava Hood
 SAVE
A cat-ear balaclava combines two strong shapes: a snug hood around the face and pointed ears above the crown. Cherilyn Q’s tutorial specifically demonstrates a balaclava with cat ears, so the finished structure already has the essential costume silhouette rather than requiring you to invent the ear placement afterward.
For Halloween, this can become a black cat, fantasy familiar, stylized wildcat, or a softer alternative to a full animal mask. Compared with the bear and fox ideas later in the list, the cat version is cleaner and more graphic because the ears provide most of the animal identity.
Ear Placement Should Follow the Worn Crown
Do not judge cat-ear position only from a flat balaclava. Once stretched over the head, the crown changes shape and the ears may lean farther outward than expected.
Try the hood on before final attachment whenever the construction allows it. Look for a pair that feels balanced from the front without drifting too far down the sides. If the ears are meant to stay sharply pointed, make sure the selected yarn and fabric density can support that look.
A Close Face Edge Works Well With Makeup
The compact opening leaves plenty of the central face visible, which makes this design easy to pair with whiskers, eyeliner, a nose detail, or other costume makeup without attaching those features to the crochet itself.
Keep the edge comfortably away from the eyes. Makeup can visually extend the cat theme while allowing the hood to stay simpler, lighter, and easier to reuse after Halloween.
Decide Between Sleek and Fuzzy Before Choosing Yarn
A smooth yarn emphasizes crisp triangular ears and gives the hood a graphic outline. A fluffier surface can suggest fur but may soften stitch definition and make small ear shapes less distinct.
Neither effect is automatically better. Decide whether you want a stylized cat silhouette or a more textured animal impression, then compare the resulting fabric rather than selecting yarn by color alone.
Original Tutorial and Creator Credit
Creator: Cherilyn Q
5. Crochet Long Ear Bunny Balaclava Hood
 SAVE
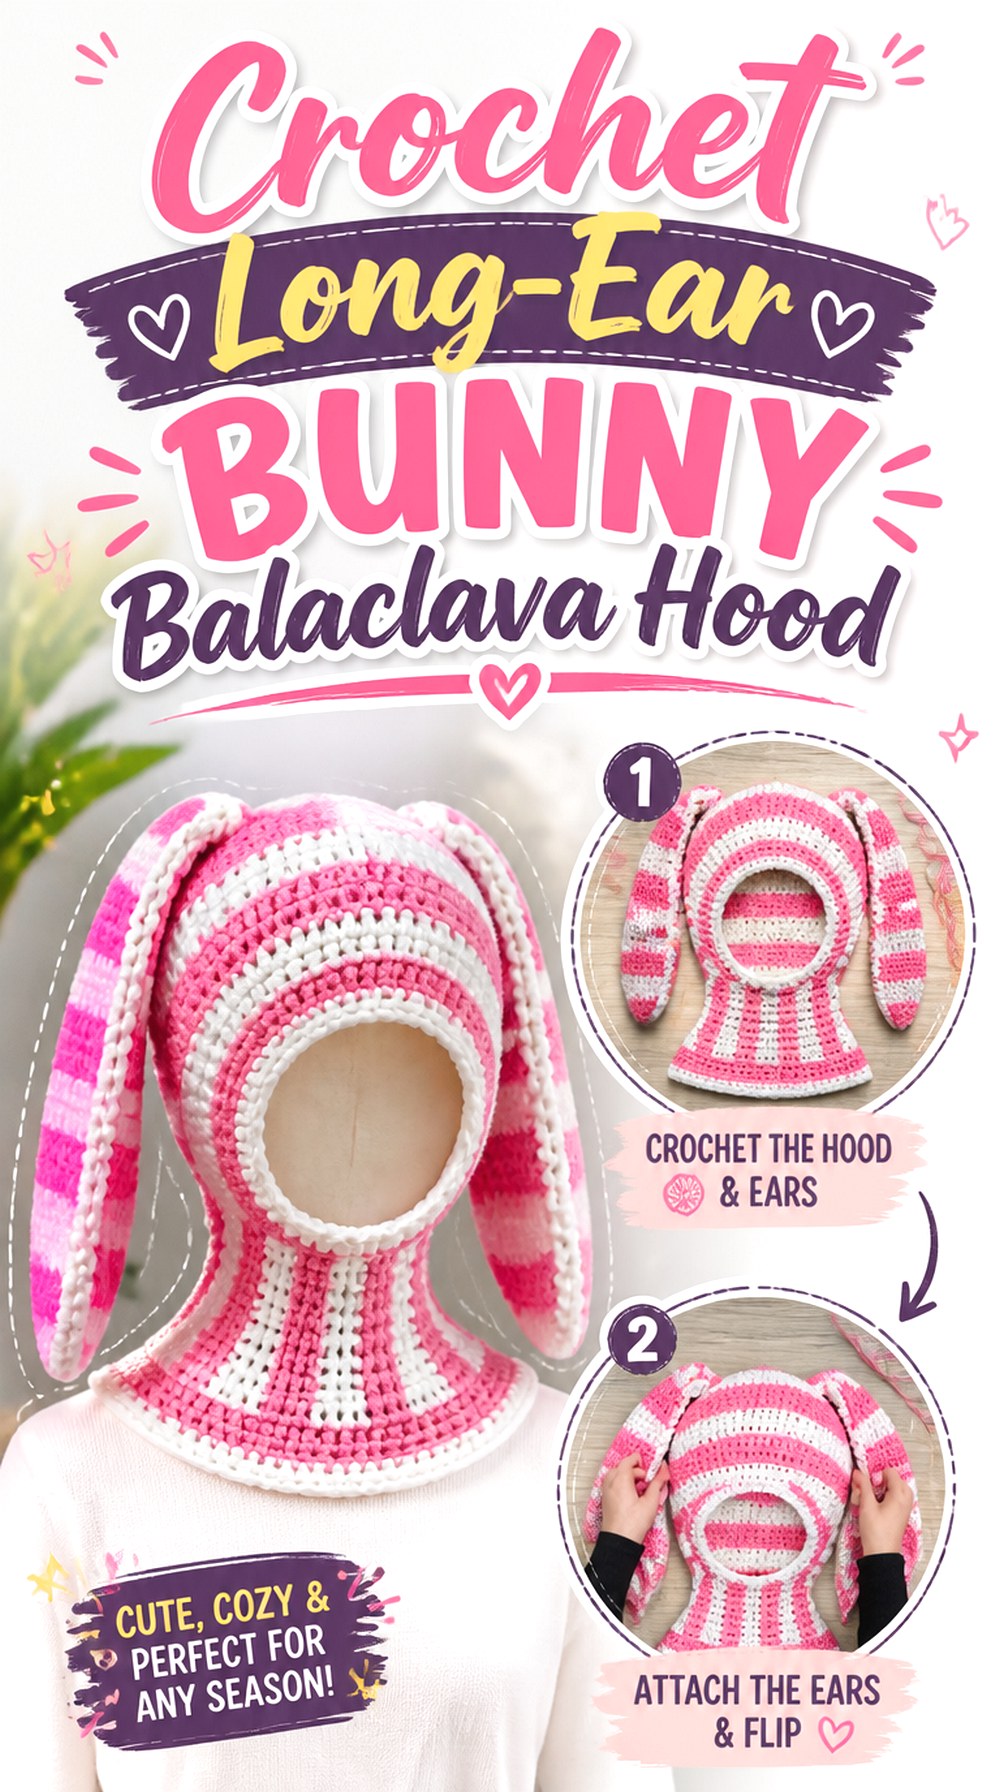
The bunny balaclava pushes the animal silhouette farther by adding long ears to an otherwise compact hood. The Feral Fairy’s tutorial covers both the balaclava and optional bunny-ear addition, giving this project a direct visual match.
For Halloween, the same structure can move in several directions: playful rabbit, eerie white bunny, woodland creature, or a deliberately mismatched gothic rabbit depending on the rest of the outfit. What separates it from the cat version is movement. Longer ears can flop, bend, or shift as the wearer walks, so placement and fabric weight have a larger effect on the final character.
Ear Length Affects Both Drama and Stability
Long ears are immediately recognizable, but more length means more weight hanging from the crown. If you substantially change yarn or scale, check whether the attachment area still supports the ear shape.
You do not need both ears to stand rigidly. A controlled flop can suit the costume. The important checkpoint is whether the movement looks intentional rather than as though the base hood is being pulled out of position.
Keep the Face Opening Comfortable Under Tension
The added ear weight can change how a stretchy balaclava sits. After the ears are attached, try the finished hood again rather than assuming the original face fit will remain unchanged.
Turn the head from side to side and make sure the opening stays clear of the eyes. This is particularly important if the costume also includes glasses, elaborate eye makeup, or a separate face accessory.
Color Blocking Can Create Character Without Extra Pieces
Bunny costumes do not require many sewn-on decorations. A contrasting inner-ear area or controlled change at the hood edge can make the silhouette easier to read while keeping the surface relatively uncluttered.
If you add embellishments, avoid placing unnecessary loose pieces near the face. Let the long-ear profile do most of the visual work.
Original Tutorial and Creator Credit
Creator: The Feral Fairy
6. Crochet Bear Spirit Hood
 SAVE
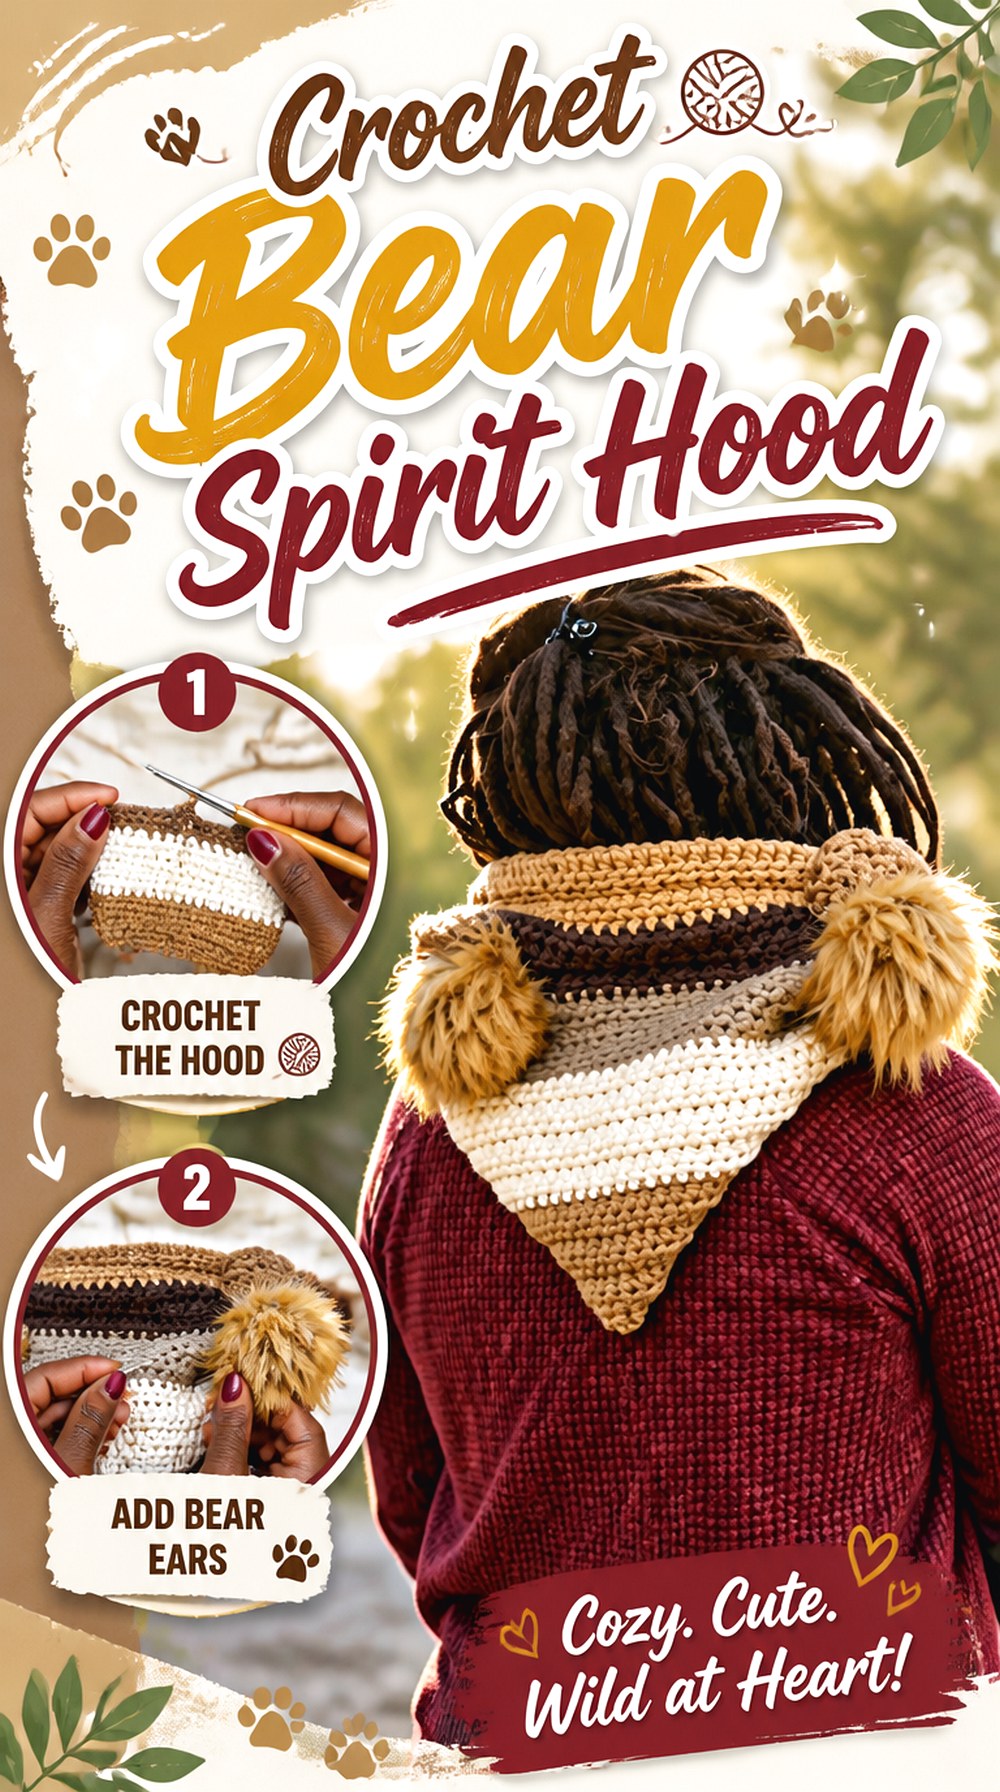
A bear spirit hood has more volume around the head and neck than the close cat and bunny balaclavas. The Crochet with illJay tutorial presents the finished piece specifically as a bear hood, spirit hood, animal hat, and crochet hood, making it a strong foundation for a woodland, enchanted forest, bear, or darker animal-spirit costume.
The rounded ears create a softer silhouette, while the deeper hood shape can frame hair instead of compressing it. That makes this idea useful when you want animal character without a mask-like effect. It can also layer over a simple sweater or costume tunic rather than requiring a matching full-body animal outfit.
Rounded Ears Need Different Support Than Cat Ears
Bear ears communicate their shape through a compact curve rather than a sharp point. Excessive stiffness can make them look more like horns, while very soft fabric can cause them to disappear against the hood.
Check their placement after the hood has settled naturally around the head. Keeping enough visible space between the ears generally helps the bear shape read from the front.
Hood Depth Changes How the Face Is Framed
A deeper animal hood can sit farther forward around the temples and cheeks. This produces a more dramatic spirit-hood look but may also reduce peripheral vision if the edge collapses inward.
Wear the hood before final finishing and look left and right. If you plan to use it outdoors or in a busy Halloween setting, visibility should take priority over an exaggerated forward drape.
This Shape Works Well With Layered Costumes
Because the lower hood adds visual weight around the neck, it can pair naturally with cloaks, vests, faux-fur-inspired crochet textures, or simple earth-toned clothing.
Avoid stacking too many bulky pieces around the same area. If the hood already provides substantial neck volume, a thinner garment underneath usually keeps the silhouette clearer.
Original Tutorial and Creator Credit
Creator: Crochet with illJay
7. Crochet Fox Hooded Cowl
 SAVE
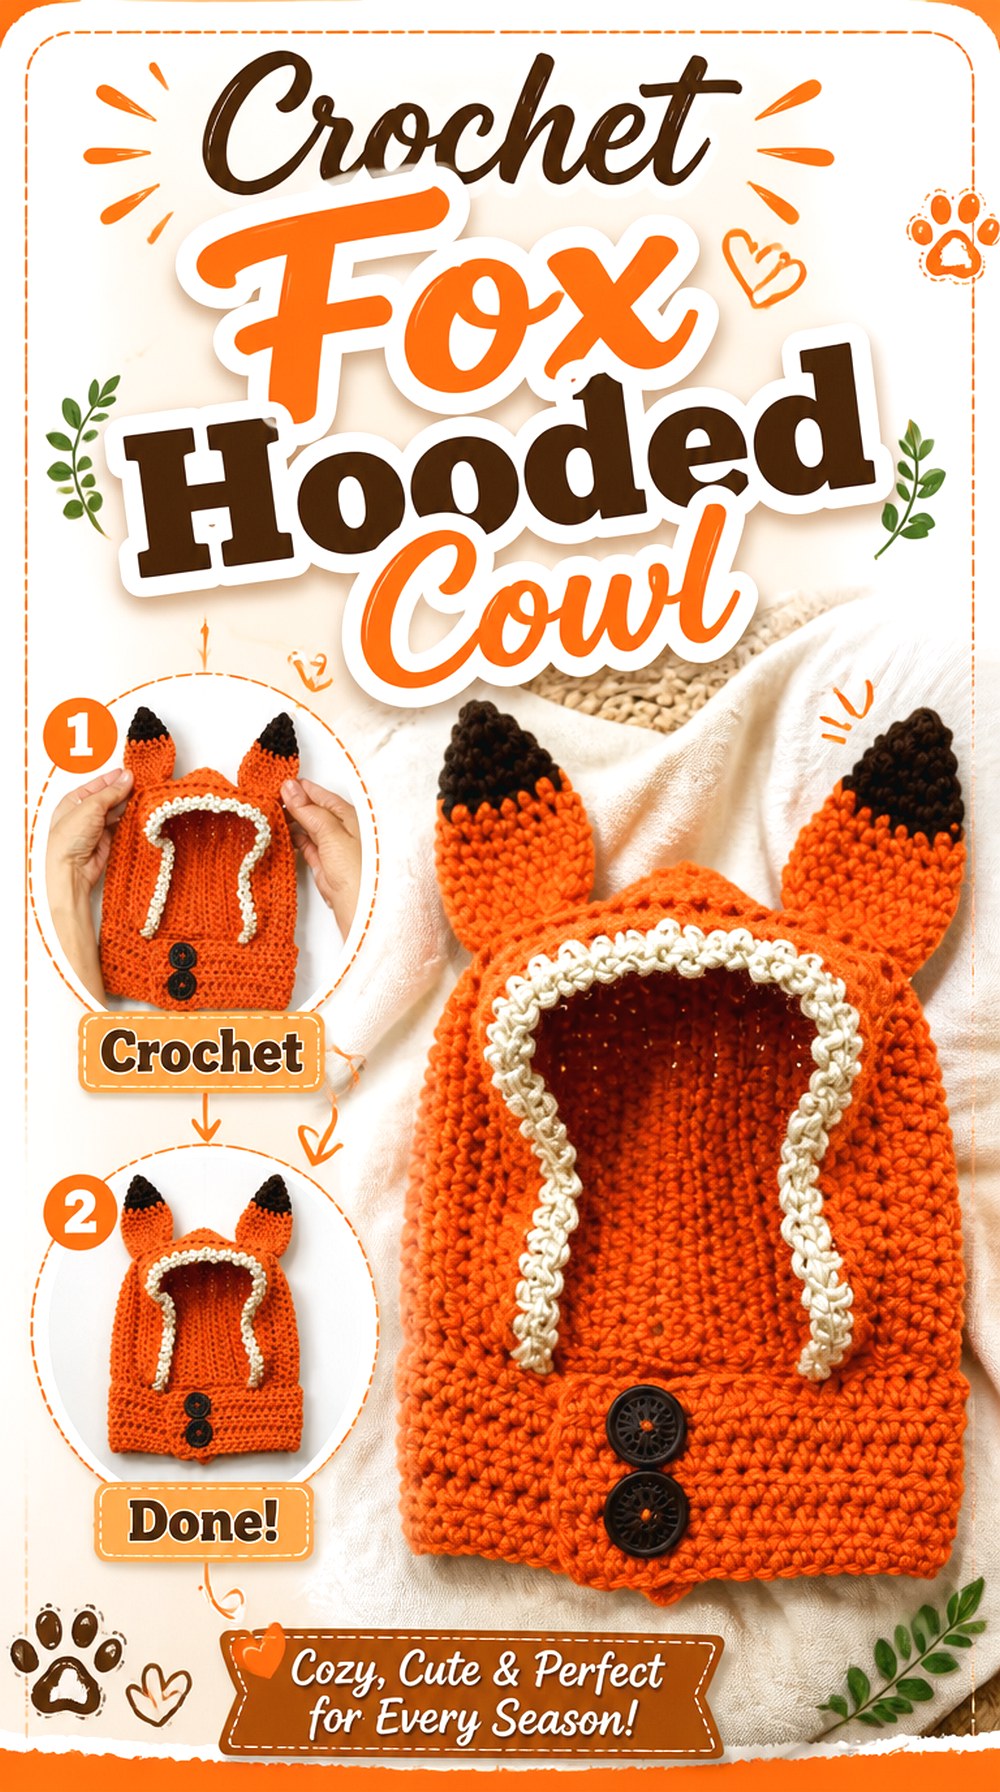
The fox hooded cowl combines recognizable animal features with a neck section that helps the accessory feel more complete as a costume. Happy Cat Crochet’s tutorial is specifically for a fox hooded cowl, giving this idea stronger facial and silhouette cues than a generic orange hood.
Compared with the bear spirit hood, the fox version can use sharper ear shapes and stronger facial contrast. It works particularly well for woodland costumes, storybook characters, forest familiars, or a costume where the hood replaces a separate mask. The cowl also gives you a natural transition between the headpiece and the rest of the outfit.
Facial Contrast Should Stay Readable From a Distance
Fox details often rely on the relationship between the main hood color and lighter or darker facial areas. Lay out the full color combination before attaching small pieces.
If two yarn colors are too close in value, details that look obvious while crocheting may disappear in photographs or dim Halloween lighting. Strong shape separation is more useful than adding many tiny features.
The Cowl Can Hide Costume Transitions
A neck cowl is useful when the clothing underneath does not perfectly match the hood. It visually bridges the gap between head and torso and can cover the neckline of a basic shirt or jacket.
Check how far the cowl extends before adding necklaces, collars, or other costume accessories. Too many competing elements around the same area can make the fox silhouette harder to read.
Ears and Muzzle Details Need Balanced Scale
The hood should still look like a fox after it is worn and viewed from several angles. Enlarging one feature dramatically can change that balance.
If customizing, adjust one element at a time and pin pieces in place before sewing. The finished head shape is a better guide than measurements borrowed from a different yarn or hook combination.
Original Tutorial and Creator Credit
Creator: Happy Cat Crochet
8. Crochet Granny Square Patchwork Balaclava Hood
 SAVE
A granny-square balaclava creates Halloween character through modular patchwork rather than sculpted ears or facial pieces. The vivi e cuci tutorial demonstrates a completed granny-square balaclava and includes the joining and finishing stages needed to understand how individual motifs become headwear.
For Halloween, this construction can lean into mismatched monster colors, vintage patchwork, circus styling, stitched-doll imagery, or a deliberately scrappy costume. It is also one of the most adaptable options in the group because each motif can contribute separately to the final color layout.
Motif Size Controls the Fit
With modular headwear, a small difference in each square can multiply across the completed layout. Measure the blocked motifs you actually plan to join rather than assuming squares made from different yarns will behave identically.
If one color or fiber produces noticeably larger squares, correct the mismatch before final assembly. Trying to force inconsistent motifs together can distort both the seams and the face opening.
Plan the Halloween Layout Before Joining
Random patchwork can look energetic, but truly random placement may put all dark or bright motifs on one side of the hood. Arrange every square first and photograph the layout before joining.
For a monster or stitched-doll effect, uneven color distribution can be intentional. The goal is to make that asymmetry feel designed rather than accidental.
Joining Lines Become Part of the Visual Design
Unlike a smooth balaclava, the seams in a granny-square hood contribute strongly to the finished surface. A contrasting join can emphasize the patchwork, while a less visible join lets the motifs dominate.
Decide which effect supports the costume before assembly. For scarecrow or monster styling, visible structure may actually add useful character.
Original Tutorial and Creator Credit
Creator: vivi e cuci
9. Crochet Pointed Wizard Hood
 SAVE
The pointed wizard hood is one of the strongest choices when you want a large fantasy silhouette rather than a close-fitting mask. KristalCrochet’s tutorial is explicitly designed as a stereotypical crochet wizard hood for Halloween, with a long pointed section that distinguishes it immediately from an everyday winter hood.
This idea works for wizards, sorcerers, dark mages, celestial characters, or fantasy scholars. Because the hood provides so much vertical shape, the rest of the costume can remain relatively simple. It is also a useful contrast to the animal hoods because its identity comes from exaggerated crown construction rather than attached ears.
The Point Needs Enough Length to Look Intentional
A slightly extended hood can resemble an ordinary seam or loose crown. A wizard shape works because the point is clearly part of the design.
If you change the size, evaluate the silhouette on the wearer before decorating it. The point does not necessarily need to stand upright; a controlled bend or droop can reinforce the wizard look while reducing stiffness.
Embellishments Should Follow the Hood’s Scale
Stars, moons, embroidery, or contrasting trim can reinforce the magical theme, but a large hood can make tiny scattered motifs look visually lost.
Place decorations while the hood is laid out at its full size, then step back before attaching them. A few well-spaced elements often read more clearly than many small details concentrated around the face.
A Lined or Layered Look Adds Visual Depth
Wizard hoods benefit from contrast at the face opening because the edge remains visible whenever the hood is worn forward. Even without adding a separate lining, a deliberate border can define the opening against the rest of the costume.
Check that additional layers do not make the crown excessively heavy. The point still needs enough freedom to fall in the way you want.
Original Tutorial and Creator Credit
Creator: KristalCrochet
10. Crochet Red Riding Hood Cape
 SAVE
A hooded cape changes the scale of the Halloween project completely. Instead of stopping at the neck, the fabric extends across the shoulders and upper body, creating a ready-made foundation for a Red Riding Hood, fairy-tale traveler, sorceress, or mysterious cloaked character. Mariie Crochet’s tutorial demonstrates a complete crochet hooded cape rather than only the hood component.
For a Red Riding Hood interpretation, red yarn provides the obvious storybook cue, but the cape construction is what truly makes the idea distinct. It creates movement when walking and gives the outfit a recognizable outline even when viewed from behind.
Cape Length Changes How the Costume Moves
More coverage creates greater visual drama, but it also means more crochet fabric moving around the shoulders and arms. Check the finished length against the activities planned for Halloween.
A cape used for walking outdoors has different practical needs from one worn mainly for photographs or an indoor party. Make sure the lower edge does not interfere with hands, bags, stairs, or other costume pieces.
The Hood Should Frame, Not Swallow, the Face
A roomy cape hood can create attractive folds, but too much fabric near the forehead may collapse into the wearer’s line of sight.
Try the cape while standing, walking, and turning the head. If the hood will be worn over a wig or styled hair, perform the fit check with that extra volume in place.
Let the Cape Carry the Storybook Theme
A recognizable hooded cape often needs fewer decorative additions than a plain hood. For Red Riding Hood styling, the silhouette itself does most of the storytelling.
Before adding appliqués or trim, view the finished cape with the intended dress, skirt, boots, or basket. Keeping the upper section relatively clean can make the classic hood shape more effective.
Original Tutorial and Creator Credit
Creator: Mariie Crochet
11. Crochet Witchy Hooded Pocket Scarf
 SAVE
A hooded pocket scarf can become a practical witch costume layer without requiring a full cape. Naztazia’s tutorial combines a hood, scarf, and pockets in one finished accessory, giving this idea noticeably more function and lower-body movement than a standard cowl.
The source project itself is not presented as a Halloween costume, so the witchy interpretation comes from styling: a dark or earthy palette, a long layered outfit, and perhaps restrained celestial or botanical accents. The built-in pockets make the silhouette particularly useful for a traveling witch, herbalist, fortune-teller, or woodland magic costume.
Pocket Ends Add Weight to the Scarf
Once items are placed inside, pockets can change how the scarf hangs. Treat them as light-use costume pockets unless you have confirmed how your specific yarn and construction behave under load.
Try the finished scarf both empty and with anything you actually plan to carry. If the ends start pulling the hood backward, move heavier essentials to a separate bag.
Long Scarf Ends Need a Movement Check
The scarf portion can be wrapped, crossed, or left hanging, which makes it visually flexible but also means the final length matters around costumes and props.
Walk around in the full outfit before Halloween. Check that the ends do not repeatedly catch on belts, bag straps, costume jewelry, or anything carried in the hands.
Witch Styling Works Through Layering
A hooded scarf is less theatrical than a pointed wizard hood, making it a good choice for a subtle witch costume or a piece you want to wear after Halloween.
Use surrounding garments to establish the character. A long skirt, textured cardigan, shawl, or simple dark dress can create the theme without permanently altering the crochet accessory.
Original Tutorial and Creator Credit
Creator: naztazia
12. Crochet Rounded Woodland Hooded Scarf
 SAVE
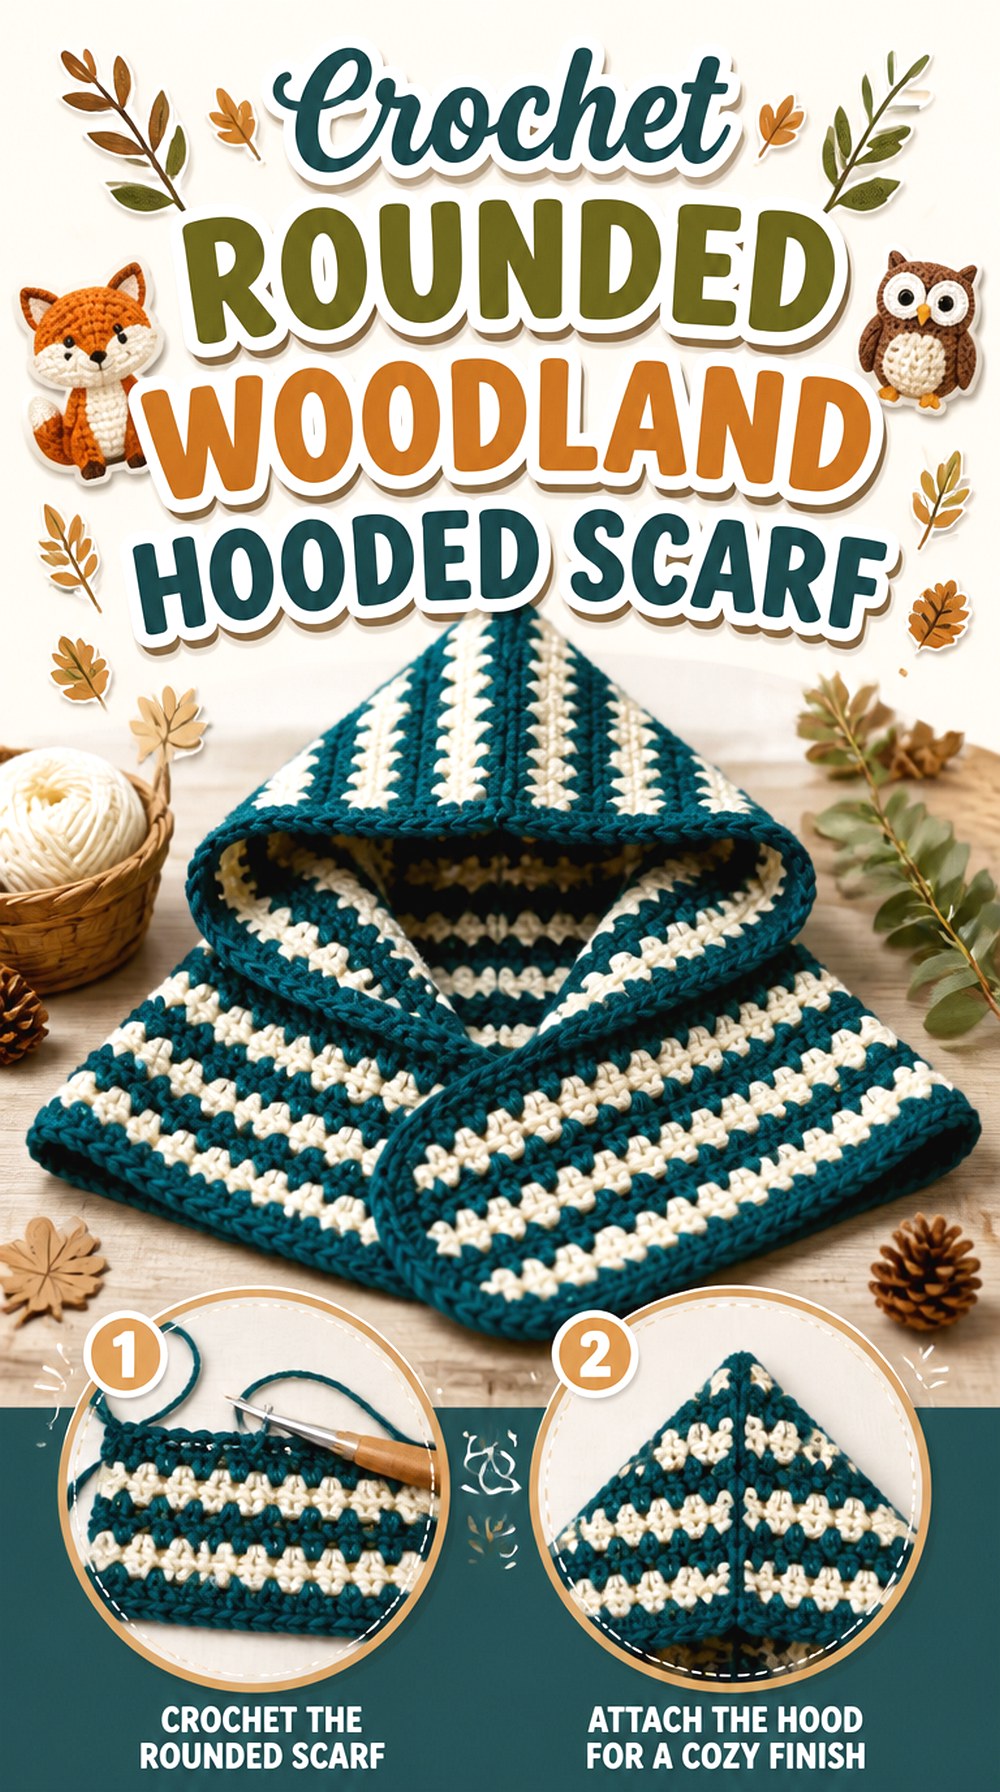
A rounded hooded scarf is a strong alternative when you want forest-witch, herbalist, fairy-tale traveler, or woodland costume styling without a sharply pointed crown. The madebymara tutorial specifically focuses on a hooded scarf with a rounded corner rather than the common pointed seam at the back.
That seemingly small construction choice changes the finished mood considerably. A rounded crown looks softer and more garment-like, which can help a Halloween outfit feel intentionally layered rather than overtly costume-like. It also makes this one of the most reusable options after the season ends.
The Rounded Crown Gives a Softer Silhouette
If your costume already has dramatic horns, shoulders, jewelry, or makeup, another sharp shape at the crown may create too many competing focal points.
The rounded hood balances those stronger details. For woodland styling, let texture and layering carry the theme while the crown remains relatively understated.
Block-Style Texture Can Handle Color Changes Well
The tutorial’s block-stitch approach gives the surface a visible rhythm, which means color changes can become part of the design rather than looking like random stripes.
For a forest-inspired version, plan the distribution before crocheting. Repeating a limited palette usually creates a more deliberate look than introducing a new color every few rows without considering the overall hood.
Fit the Hood Before Finalizing Scarf Length
The hood and scarf function together, but they solve different fitting problems. Make sure the crown and face opening feel right before deciding that longer scarf ends will improve the piece.
Extra scarf length adds styling flexibility but also more fabric. Choose the amount that works with your coat or costume instead of automatically maximizing it.
Original Tutorial and Creator Credit
Creator: madebymara
13. Crochet Granny Square Scarecrow Scoodie
 SAVE
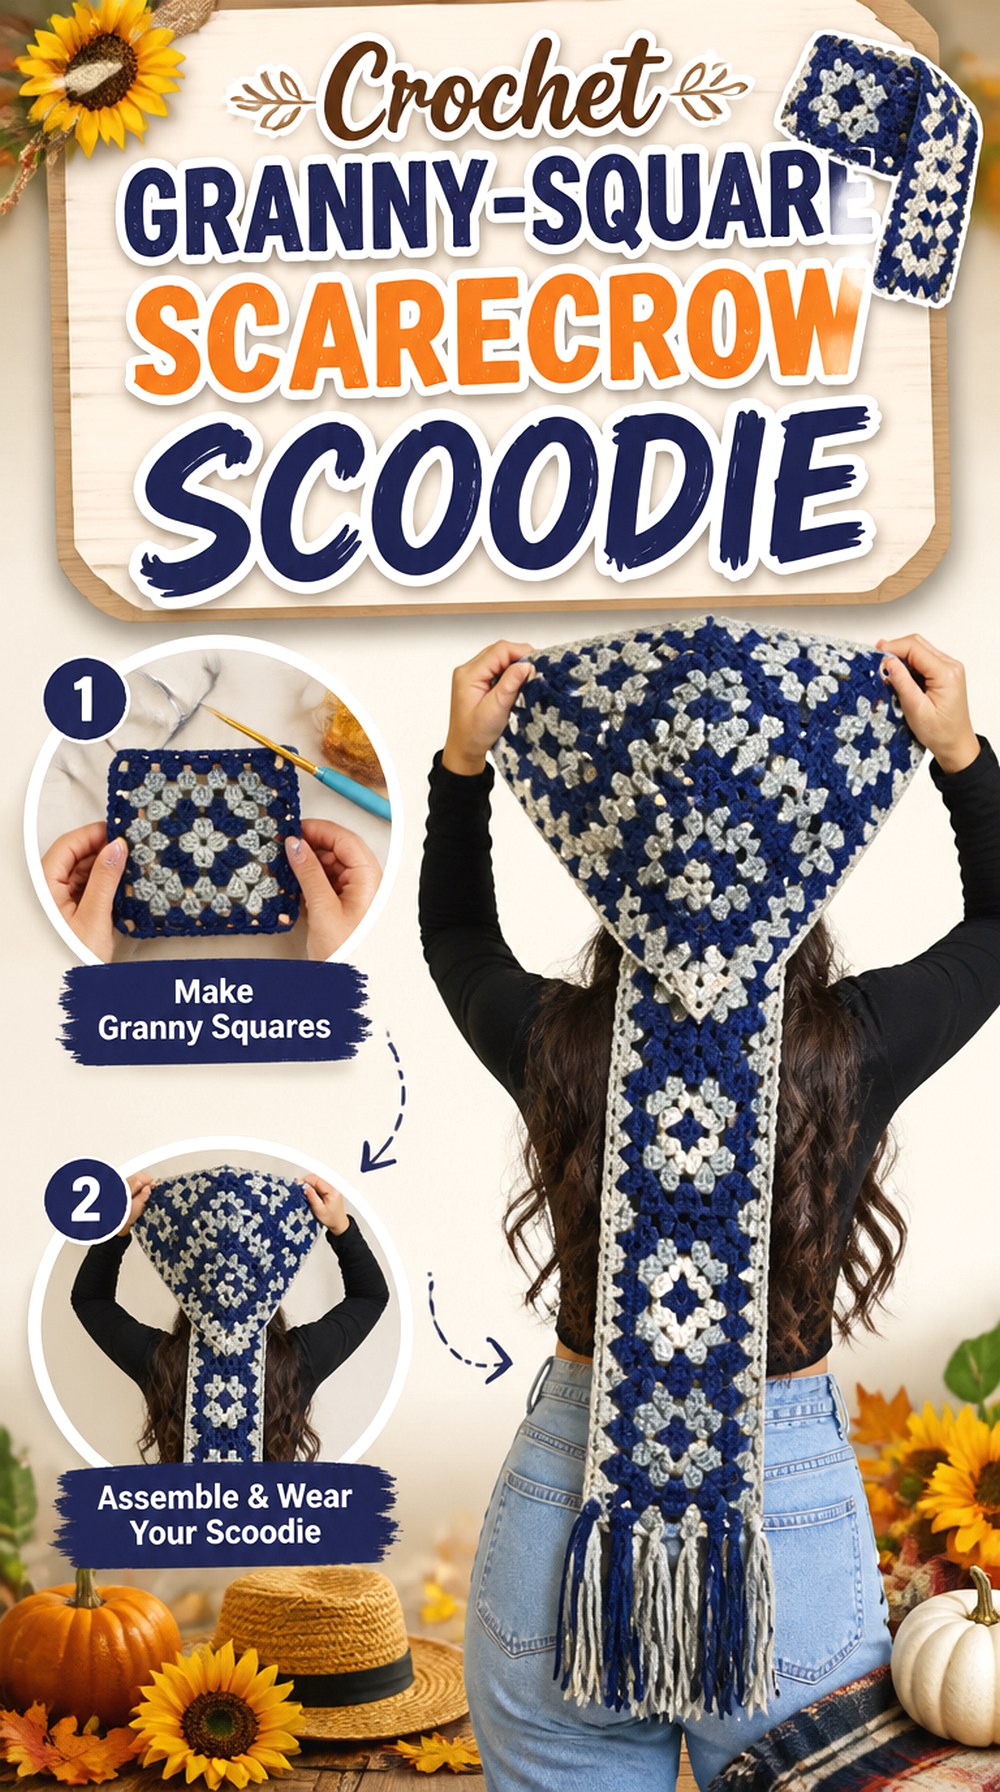
This granny-square scoodie combines modular crochet with long scarf sections, making it a natural starting point for a patchwork scarecrow, harvest character, stitched doll, or mismatched Halloween traveler. Käthe’s tutorial demonstrates a complete hooded scarf made from granny squares, so the patchwork is structural rather than merely decorative.
Compared with the fitted granny-square balaclava earlier in the list, this version leaves the face more open and extends the patchwork down the body through scarf ends. That makes it a better match when the costume uses visible layering around the shoulders and chest.
Patchwork Can Connect the Hood to the Whole Outfit
A scarecrow costume often uses several fabrics or colors across the body. Repeating one or two hood colors elsewhere in the outfit can make the crochet accessory feel integrated rather than added at the last minute.
You do not need every garment to match. One repeated rust, straw, brown, green, or muted accent can be enough to visually connect separate pieces.
Square Consistency Matters Around the Crown
Because motifs are joined into a three-dimensional wearable, inconsistent square sizes can produce awkward bumps or uneven seams.
Block and compare the motifs before assembly. If a square sits noticeably larger than the rest, correct that issue before joining rather than hoping the scarf’s drape will hide it.
Keep Added Scarecrow Details Away From the Face Edge
Fringe, raffia-like yarn effects, patch appliqués, or small decorative stitches can strengthen the scarecrow idea, but placement matters.
Keep the immediate eye area uncluttered and check that any hanging details stay out of the mouth and nose area. Costume texture is most effective when it does not interfere with comfortable wear.
Which Crochet Halloween Hood Shape Should You Choose?
| If you want… | Strong options | Main detail to check |
|---|---|---|
| A clearly spooky face covering | Spiderweb, skull, cat, bunny | Face opening and visibility |
| Strong sculptural details | Devil, cat, bunny, bear, fox | Ear or horn placement |
| A dramatic fantasy profile | Wizard hood or hooded cape | Crown depth and overall drape |
| More neck coverage | Bear hood, fox cowl, pocket scarf | Bulk around collars and shoulders |
| Modular patchwork | Granny balaclava or scarecrow scoodie | Blocked motif consistency |
| A subtler Halloween wearable | Witchy pocket scarf or woodland hood | Styling with the rest of the outfit |
| Maximum costume movement | Hooded cape or long scoodie | Hanging length and surrounding props |
The closest fitting options make the hood feel almost like a mask, while the cape, wizard hood, and scoodies rely more on drape and overall silhouette. If makeup is an important part of the costume, an open hood, bonnet, or cape may be easier to coordinate. If the crochet itself needs to communicate the character, the skull, spiderweb, devil, fox, or animal-ear options provide stronger built-in visual cues.
Conclusion
The right crochet Halloween hood depends less on a single spooky color and more on the shape you want around the head and shoulders. Choose the spiderweb or skull designs when the hood should dominate the costume, the cat, bunny, bear, or fox versions for recognizable animal silhouettes, and the wizard or cape options when you want dramatic fabric and movement.
Patchwork balaclavas and scoodies work especially well for monster, scarecrow, and stitched-doll concepts, while a rounded or pocketed hooded scarf can create a quieter witch or woodland look that remains useful after Halloween. Once you choose the silhouette, check fit, visibility, weight, and attachment placement before adding decoration. Use the original tutorials near each idea for the creators’ exact construction details.
Frequently Asked Questions
Can I turn a regular crochet hood tutorial into a Halloween hood?
Yes, when the base construction already suits the character you want. A hooded cape can become a storybook costume, while a deep hooded scarf can support witch or woodland styling. The adaptation should involve more than changing to black or orange yarn. Think about silhouette, trim, layering, closure, motif placement, and how the hood relates to the full costume. Avoid adding structural pieces such as large horns to a very soft hood unless the fabric can support them.
How do I know whether a crochet balaclava opening is large enough?
Fit the actual hood on the intended wearer and check the opening while looking forward and turning the head naturally. The crochet should stay out of the eyes and should not require constant adjustment. Glasses, wigs, makeup, and different hairstyles can all change the effective fit. If you substitute yarn or change hook size, do not assume the tutorial’s finished proportions will remain the same; compare the fabric and fit as the project develops.
What type of yarn is better for crochet Halloween hoods with ears or horns?
Look at the fabric behavior you need rather than selecting by fiber name alone. Sculptural details generally benefit from crochet fabric that does not collapse too easily, while capes and oversized fantasy hoods often look better with some drape. A fuzzy surface can suit animal costumes but may soften crisp ear or stitch definition. Make a small fabric sample when changing yarn and consider how its density, stretch, and weight will affect both the hood and attached pieces.
Should I block granny squares before making a Halloween balaclava or scoodie?
Blocking can make it much easier to compare the actual dimensions of several motifs before joining. That is especially useful for headwear because small size differences can accumulate and distort the face opening or crown. Arrange the prepared squares in their final layout before assembly as well. This gives you a chance to balance Halloween colors and motifs and to spot size inconsistencies before they become part of a three-dimensional hood.
How can I make a crochet Halloween hood comfortable for several hours?
Start with fit rather than decoration. Check the crown, face edge, neck area, seams, and anything attached near the temples or forehead. Then wear the completed hood with the rest of the costume for a trial period rather than testing it separately. Heavy scarf ends, large horns, wigs, coat collars, and props can all affect how the hood sits. Remove or reposition details that obstruct vision, rub the face, or repeatedly pull the hood out of place.
Are long ties and scarf ends practical for Halloween costumes?
They can be, but their usefulness depends on the setting and the rest of the outfit. Long ends add movement and can help a wizard, witch, scarecrow, or woodland costume look more layered. They can also interfere with bags, props, doors, or crowded spaces. Try the complete outfit while walking and sitting, and arrange or secure long sections when necessary. For children, choose closures and embellishments appropriate to the wearer’s age and supervision.