14 Crochet Fringe Scarf Ideas for Texture, Shape, and Statement Ends
Fringe can completely change the character of a crochet scarf, but the strongest designs do more than attach yarn to two straight edges. This collection ranges from narrow rectangular scarves and oversized winter wraps to shallow triangles, granny-square construction, airy mesh, pockets, chain fringe, tassels, and double-knotted finishes.
The important differences are in proportion as much as decoration. A bulky super scarf needs a different fringe balance than a lightweight lace scarf, while a triangular piece can use fringe to emphasize its point or angled sides. The 14 ideas below make those choices easier to compare. Each project is paired with an original creator tutorial so you can examine the intended construction before deciding whether to follow the design closely or adapt details such as length, yarn, fringe density, or styling.
Quick List
- Crochet Angled-End Scarf with Double-Knotted Fringe
- Crochet Geometric V-Stitch Scarf with Knotted Fringe
- Crochet Lacy Shell Scarf with Long Fringe
- Crochet Striped Moss Stitch Scarf with Full Fringe
- Crochet Chunky Lengthwise Scarf with Chain Fringe
- Crochet Crisscross Super Scarf with Oversized Fringe
- Crochet Granny-Square Scarf with Tassel Fringe
- Crochet V-Stitch Triangle Scarf with Side Fringe
- Crochet Airy Triangle Wrap Scarf with Flowing Fringe
- Crochet Shallow Western Triangle Scarf with Fringe
- Crochet Bobble-Texture Triangle Scarf with Chunky Tassels
- Crochet Shell-Texture Rectangular Scarf with Fringe
- Crochet Long Wrap Scarf with Optional Pockets and Fringe
- Crochet Mesh Triangle Hip Scarf with Fringe
Choose Fringe by Movement, Not Just Length
Longer fringe creates more movement, but length is only one part of the decision. The number of strands in each bundle, spacing between attachment points, yarn twist, and whether the strands are knotted again can make fringe look airy, dense, graphic, or deliberately untamed.
Also consider where the fringe sits. Straight-ended rectangular scarves usually create a horizontal fringe line, while triangle scarves can direct the eye toward a center point. Tassels concentrate visual weight in fewer places. Double-knotted fringe introduces a decorative layer above the loose ends, and crocheted chain fringe behaves differently again because it forms loops rather than loose cut strands.
Before cutting a large quantity of yarn, attach a few temporary samples. Hold or wear the scarf as intended and check whether the fringe supports the silhouette instead of overwhelming it.
Match Yarn Weight to Drape and Fringe Weight
Changing yarn can affect the scarf body and the fringe at the same time. A heavier yarn may make a textured scarf feel substantial, but using that same yarn in dense fringe can add considerable visual and physical weight at the ends. A fine yarn creates lighter movement but may need more strands if you want a fuller appearance.
Open lace deserves particular attention. A yarn substitution that produces a stiff fabric can reduce the drape that makes large holes and shell patterns attractive. Conversely, very loose or fuzzy yarn may soften stitch definition so much that detailed texture becomes less noticeable.
Treat the tutorial yarn and hook information as a starting point rather than assuming any same-weight yarn will behave identically. When substituting, make a useful swatch and compare its flexibility, thickness, stitch clarity, and hanging weight before committing to the whole scarf.
Check Scarf Proportions Before Finishing the Ends
Fringe adds visible length, so check the scarf body before attaching it. This matters especially on super scarves, wraps, and scarves intended to loop around the neck more than once. A body that already feels long may become awkward once substantial fringe is added.
Triangle scarves require a different checkpoint. Compare the top width with the depth of the center point. A shallow triangle behaves more like a neck scarf, while a deeper triangle can provide considerably more front or shoulder coverage. Fringe along angled edges further emphasizes that depth.
For rectangular scarves, check both width and intended wrapping style. Narrow scarves can carry surprisingly dramatic fringe without adding bulk around the neck, whereas a wide, heavy scarf may benefit from a lighter end treatment. Make these decisions before final trimming, because shortening fringe is easier than restoring strands cut too short.
1. Crochet Angled End Scarf with Double Knotted Fringe

Instead of finishing as a standard rectangle, this scarf tapers into angled ends that give the fringe a built-in direction. The original Mint-cicle design uses half double crochet shaping and finishes those sloping edges with double-knotted fringe, creating a much more graphic result than ordinary straight tassels. The body remains relatively streamlined, so most of the visual drama happens at the two ends.
This is a useful choice when you want a fringe scarf that still looks controlled rather than heavily embellished. The angled silhouette is also worth considering before substituting yarn, because thick fringe bundles can make a narrow tapered end feel considerably more substantial.
Let the Angled Edge Lead the Finish
With a shaped end, uneven fringe placement is easier to notice because the attachments form a visible diagonal. Space the bundles according to the construction rather than assuming a straight horizontal rhythm will work. Once several sections are attached, lay the scarf flat and compare both ends before adding the secondary knots.
The goal is visual symmetry, not necessarily forcing every strand into an identical position if the shaped fabric naturally provides slightly different attachment points.
Consider How Bulky Yarn Changes the Knots
Double-knotting creates an extra decorative band within the fringe. That band becomes more prominent as the yarn gets thicker or the bundles contain more strands. If substituting yarn, make a small fringe sample first and check whether the knots remain flexible.
A knot treatment that looks delicate in one yarn can become bulky in another, particularly on a scarf with relatively narrow ends. Reducing the bundle size may preserve the design without changing the scarf body.
Original Tutorial and Creator Credit
Creator/Site: Left in Knots
2. Crochet Geometric V Stitch Scarf with Knotted Fringe

This rectangular scarf puts texture first. Nana’s Crafty Home uses a Nesting V-stitch arrangement for the Diamond Tessera Fringe Scarf, producing a dense geometric surface, then finishes the ends with a more decorative knotted fringe rather than leaving the strands completely loose. The source also uses multiple colors, so the scarf combines stitch geometry, color changes, and fringe in one relatively narrow accessory.
It stands apart from open lace options because the body has much stronger visual density. If you like fringe but do not want it to be the only interesting detail, this type of fabric gives the scarf enough texture to hold its own even before the end treatment is added.
Prioritize Stitch Definition
A geometric V-stitch texture benefits from yarn that lets the repeated shapes remain visible. Extremely fuzzy fibers can soften those lines, while a very stiff substitution may change the scarf’s drape.
Before changing yarn, crochet enough of the stitch pattern to see several repeats. Examine it both flat and hanging. The second view matters because a scarf is rarely displayed perfectly flat, and strong surface texture should still read when the fabric folds around the neck.
Treat Color Changes as Part of the Edge Plan
When several colors travel through a rectangular scarf, the side edges deserve as much attention as the center fabric. The original design includes an edging approach that helps manage the appearance of yarn changes.
If you develop your own palette, decide whether you want crisp color bands or lower-contrast changes before starting. Frequent color changes also create more finishing decisions, so avoid introducing extra colors only for variety unless they improve the geometric effect.
Give the Knotted Fringe Enough Breathing Room
Decorative knots create structure within the fringe itself. That means spacing affects the final appearance more than it does with sparse, loose strands.
Attach several neighboring bundles before tying the decorative knots and check whether they form a clean rhythm. Too much material can hide the knotwork; too little can make the connected sections look isolated. It is usually easier to adjust bundle density at this stage than after every end has been cut and trimmed.
Original Tutorial and Creator Credit
Creator/Site: Nana’s Crafty Home
3. Crochet Lacy Shell Scarf with Long Fringe

The Thursday Scarf from Sandra Stitches shifts the focus from dense texture to open shell-and-chain fabric. Its diamond-like mesh creates visible negative space, while long fringe continues the vertical lines at the scarf ends. The designer shows the concept in substantially different yarn choices, including a bulkier photographed version and a thinner cotton-blend version in the video, illustrating how strongly fiber and weight can alter the same underlying scarf.
That makes this a useful idea for readers interested in fringe beyond cold-weather scarves. The main decision is whether you want the lace to look soft and substantial or light and airy; fringe density should follow that choice rather than being treated separately.
Match the Fringe to the Openness of the Lace
An open body creates a lot of visual space. Very dense fringe can suddenly make the bottom edge look much heavier than the scarf above it.
If your yarn substitution produces especially delicate mesh, experiment with fewer strands per bundle or slightly wider spacing. With a more substantial fabric, fuller fringe may feel balanced. Hold the scarf vertically during this check—the relationship between the open body and hanging ends becomes much clearer when gravity is involved.
Block Before Making the Final Trim
Lace can change dimensions after appropriate blocking, depending on fiber and construction. If the fabric is meant to be shaped or opened, complete that stage according to the yarn label and creator guidance before making a precision fringe trim.
Otherwise, a scarf that becomes slightly longer or wider after finishing may leave the fringe looking shorter or denser than planned. Mixed fibers and substituted yarns can respond differently, so avoid assuming one blocking method suits every version.
Keep the Ends from Competing with the Stitch Pattern
The shells and chain spaces already provide a decorative repeat. Fringe works best here as an extension of the design rather than a second unrelated focal point.
If you introduce multiple fringe colors, unusual knots, or extra embellishment, compare them against the lace before committing. A simple fringe treatment can be the stronger choice when the body pattern is already visually active.
Original Tutorial and Creator Credit
Creator/Site: Sandra Stitches
4. Crochet Striped Moss Stitch Scarf with Full Fringe
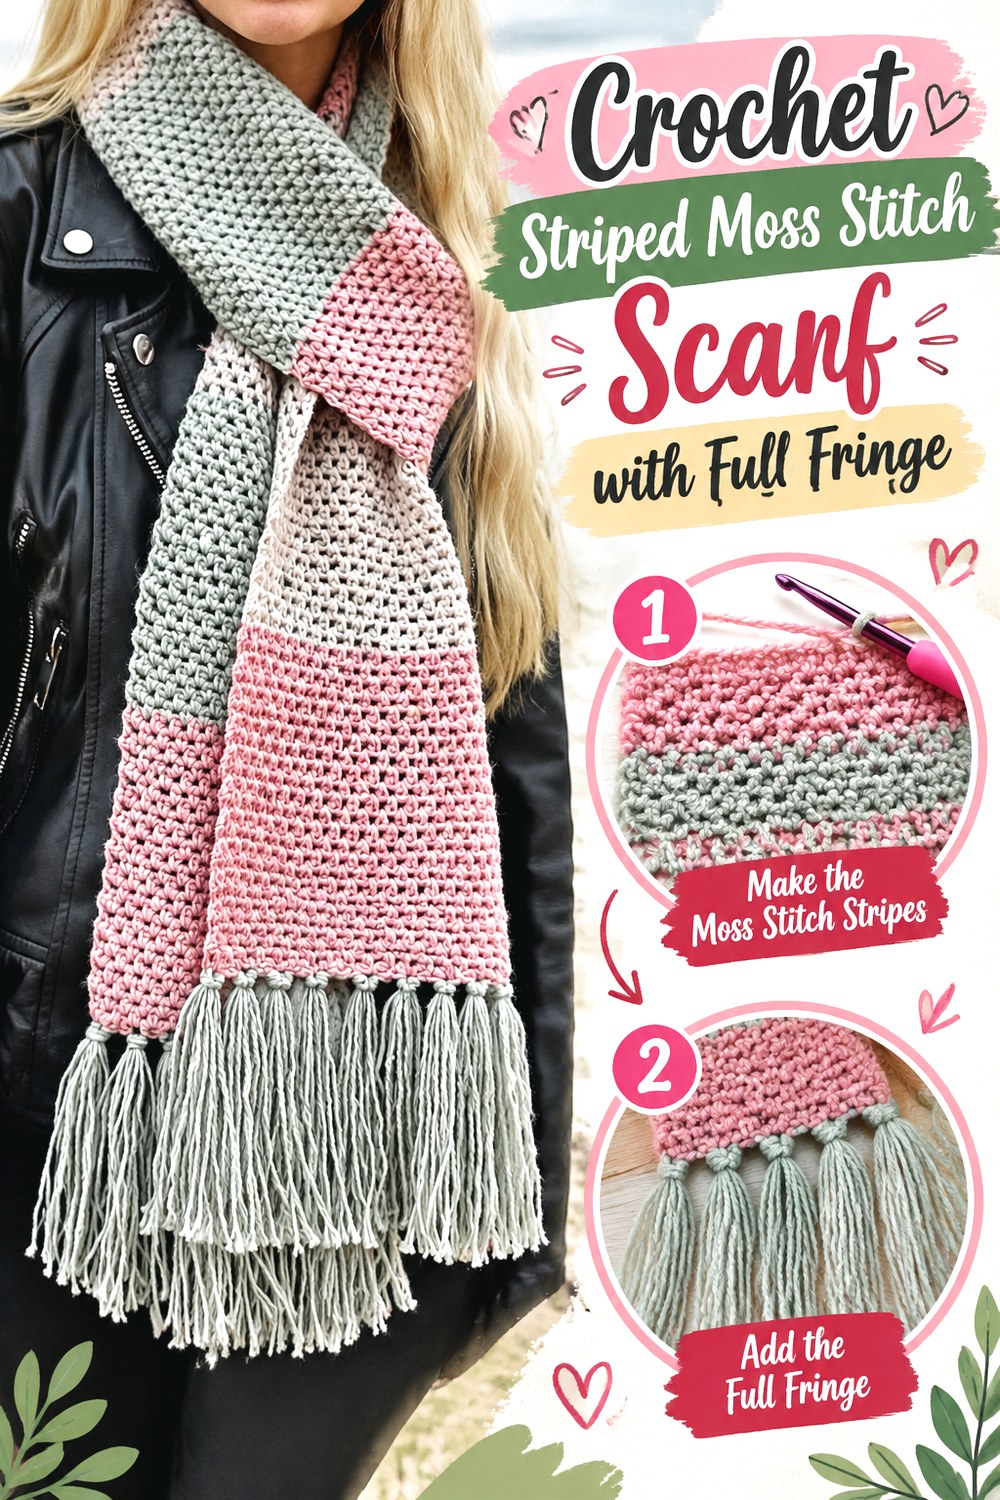
This scarf uses moss stitch to create a relatively even, textured surface, then introduces color in broad stripes and finishes both short ends with generous fringe. Annie Design Crochet’s original version uses three coordinated colors, giving the scarf a softer rhythm than narrow multicolor striping. The pattern is also adjustable in width and length, with the fringe treated as a finishing element rather than part of the scarf body.
Choose this approach when you want color to do much of the visual work without relying on complicated surface texture. Because moss stitch has a small-scale repeat, the wider color sections and fringe remain easy to read from a distance.
Plan the Stripe Rhythm Before the First Color Change
Broad stripes can make a long scarf appear more segmented or more unified depending on contrast. Lay your chosen skeins together and decide whether one color should dominate, repeat at the ends, or act as the fringe color.
If you change the stripe proportions, check the full projected sequence rather than deciding section by section. A color arrangement that looks balanced halfway through can become uneven once the full scarf length is visible.
Give the Foundation Edge the Same Flexibility as the Fabric
Moss stitch can produce a pleasantly flexible scarf, but a tight starting edge may restrict that movement. The original tutorial specifically addresses the foundation setup and later fringe finishing.
When substituting yarn or hook size, compare the beginning edge with the width of the established fabric. If it pulls inward, correct the tension early. Fringe can disguise a visually imperfect end, but it cannot restore flexibility to an overly tight foundation.
Original Tutorial and Creator Credit
Creator/Site: Annie Design Crochet
5. Crochet Chunky Lengthwise Scarf with Chain Fringe

The Sierra Nevada scarf changes both the construction direction and the fringe method. Jera’s Jamboree works the chunky scarf lengthwise with crossed half double crochet texture, then creates fringe from crocheted chains rather than bundles of cut yarn. The resulting end treatment has defined loops and a more constructed appearance than traditional loose fringe.
This makes the project particularly interesting if trimming dozens of loose strands is not the look you want. Lengthwise construction also creates long uninterrupted textural lines. Because the foundation establishes most of the final scarf length at once, however, the overall proportion needs attention earlier than it would on a scarf that simply grows row by row.
Understand What Chain Fringe Changes
Crocheted chain fringe has its own structure, so it will not move exactly like loose yarn strands. The loops can look more deliberate and uniform, but they may also react differently to snagging or stretching depending on the yarn.
Make one or two trial loops at the edge and examine how they hang. If you alter their length, remember that a longer crocheted chain may introduce more stretch than a short decorative loop.
Confirm the Length Early
With a lengthwise scarf, changing the final length can be less convenient once the main rows are underway. Before committing to the full fabric, compare the planned body length with the wearer’s preferred styling method.
Factor in the visual extension created by the chain fringe as well. Even when the looped ends do not add the same flowing length as cut fringe, they still change the overall silhouette.
Original Tutorial and Creator Credit
Creator/Site: Jera’s Jamboree
6. Crochet Crisscross Super Scarf with Oversized Fringe

A super scarf makes proportion the defining feature. Dream a Little Bigger’s Crisscross Crochet Super Scarf is intentionally oversized, combining crossed double crochet texture, back-loop work, substantial length, and fringe at the ends. The original sample measures well over the length of an ordinary scarf, so it is designed to create dramatic wrapping and long hanging sections rather than a compact neck accessory.
This scale gives fringe more room to look bold, but it also increases the importance of yarn weight and wearer comfort. Before choosing this direction, decide whether you actually want the visual volume of a super scarf or simply like its stitch texture.
Test the Scale Against the Wearer
An oversized scarf can be styled with multiple wraps, but width and length determine whether those wraps feel comfortable or cumbersome. Hold a measuring tape, existing scarf, or temporary length of fabric around the intended wearer to visualize the scale before investing in the full project.
Petite styling preferences do not automatically require a smaller scarf, but the decision should be deliberate. The same applies if you plan to wear it under a fitted coat rather than over outerwear.
Balance Texture Against Total Weight
Crossed stitches create noticeable texture without requiring the body to be completely solid, but yarn substitution can still change the finished weight significantly.
A super scarf contains a lot of fabric. Before moving to an even heavier yarn, make a sizeable swatch and feel its weight when hanging rather than resting on a table. Added fringe then contributes more material at the ends, so evaluate the complete concept rather than the body alone.
Trim Fringe After Seeing the Full Drape
On an oversized accessory, short fringe can appear visually underscaled while extremely long fringe may add more length than expected. Attach the strands, put the scarf on, and observe how far the ends fall before doing the final trim.
This is also a good time to check floor clearance and general practicality. Fringe should enhance the dramatic proportions without becoming an inconvenience during normal wear.
Original Tutorial and Creator Credit
Creator/Site: Dream a Little Bigger
7. Crochet Granny Square Scarf with Tassel Fringe

The Crocus Scarf replaces continuous rows with a line of granny squares joined into a long, narrow scarf. Colour Ceilidh Crochet uses multiple flower-inspired colors and finishes the two ends with tassel fringe, so the project has two distinct sources of rhythm: repeating square motifs and concentrated end texture.
Modular construction makes this idea especially useful for color planning. You can evaluate individual motifs before the full scarf exists, but the final arrangement still matters. A combination that looks lively in one square may become visually busy when repeated many times in a long strip, particularly once multistrand tassels are added.
Plan Motif Color Across the Whole Scarf
Photograph or lay out completed squares before joining them. Look for accidental clustering of the strongest colors and check whether the two ends feel related.
You do not need strict symmetry unless that is the desired effect, but deliberate distribution usually looks more cohesive than a random sequence created only from the order in which motifs were crocheted. Remember that tassel color can either reinforce the palette or provide a calmer frame.
Make the Join Lines Part of the Design
On a narrow granny-square scarf, joins are close to the outer edges and remain visible during wear. Keep motif dimensions consistent before joining; blocking or shaping individual squares may help when appropriate for the yarn.
If some squares differ noticeably in size, forcing them together can create rippling along the scarf. Fix the underlying motif consistency first rather than relying on fringe to distract from uneven assembly.
Original Tutorial and Creator Credit
Creator/Site: Colour Ceilidh Crochet
8. Crochet V Stitch Triangle Scarf with Side Fringe

The Fiesta Fringe design from Two Brothers Blankets uses an open V-stitch to build a triangular scarf and treats fringe as an optional finish along the angled sides. The source also discusses alternatives such as tassels or leaving the edge plain, which makes the underlying triangle a useful base for comparing different end treatments.
Unlike a rectangular scarf, the fringe does not simply mark where the fabric stops. It reinforces the slope toward the bottom point. That makes spacing especially important: the eye naturally follows the two diagonal edges, so inconsistent attachment can be more noticeable than it would be across a straight end.
Choose Triangle Width by Styling Goal
A triangle can be worn close to the neck, with its point centered at the front, or expanded toward wrap-like coverage. Before adding more repeats to increase the width, consider what that will do to the depth as well.
A larger triangle is not simply a longer scarf. It adds more fabric across the chest or shoulders, and a fringed edge increases the visual depth further. Compare both measurements to the intended styling method.
Space Side Fringe Symmetrically
Work outward from the center point or use another consistent reference so both angled edges receive comparable fringe placement. Check the scarf folded in half before trimming.
The two sides do not need mathematical perfection if the handmade fabric provides slightly different attachment positions, but the overall density should appear balanced when the point is centered on the body.
Protect the Open Character of the V-Stitch
Open V-stitch fabric gets much of its character from the spaces between stitch groups. If you substitute a very dense or fuzzy yarn, those openings may become less distinct.
Swatch enough repeats to judge both drape and negative space. A fringe-heavy finish works particularly well when the body still has enough openness to create contrast.
Original Tutorial and Creator Credit
Creator/Site: Two Brothers Blankets
9. Crochet Airy Triangle Wrap Scarf with Flowing Fringe

The Dreaming of Spring Triangle Scarf uses an open, airy triangle with extensive fringe and enough coverage to function as either a scarf or wrap. The Knotted Nest combines half double crochet with contrasting taller-stitch sections, and the page was updated in 2026 because the originally featured Red Heart Dreamy yarn had been discontinued, with substitution suggestions added by the creator.
This is a strong example of why yarn choice deserves separate attention from stitch choice. The design relies on a soft, somewhat fuzzy appearance, but substitutes can vary considerably in loft, weight, and stitch visibility even when they seem similar at first glance.
Expect Fuzzy Yarn to Soften Detail
A haloed or textured yarn can create an appealing soft surface, but it may make stitch boundaries harder to see while you work. If you substitute another fuzzy fiber, crochet a swatch large enough to practice identifying spaces and edge stitches.
This is particularly important in triangle growth, where regularly missing an edge placement can gradually distort the shape. Good lighting and occasional stitch counting can be more useful than trying to judge every row by appearance alone.
Check Both Long Edges for Balanced Growth
Triangle scarves reveal asymmetry quickly because the center point provides a strong visual reference. Periodically fold the work at the center and compare the two sides.
Small tension variations do not necessarily ruin the project, but consistent differences can become more noticeable once fringe creates strong lines down both edges. Catching the issue while the triangle is still growing is easier than trying to disguise it during finishing.
Decide Between Scarf and Wrap Coverage
This design can provide more coverage than a shallow neck triangle. If you plan to wear it primarily around the neck, consider how much fabric you are comfortable wrapping. If shoulder coverage is the goal, depth may be an advantage.
Do not adjust only the top width without considering how the triangle’s depth changes. Fringe makes the center point appear longer still, so evaluate the body before attaching it.
Original Tutorial and Creator Credit
Creator/Site: The Knotted Nest
10. Crochet Shallow Western Triangle Scarf with Fringe
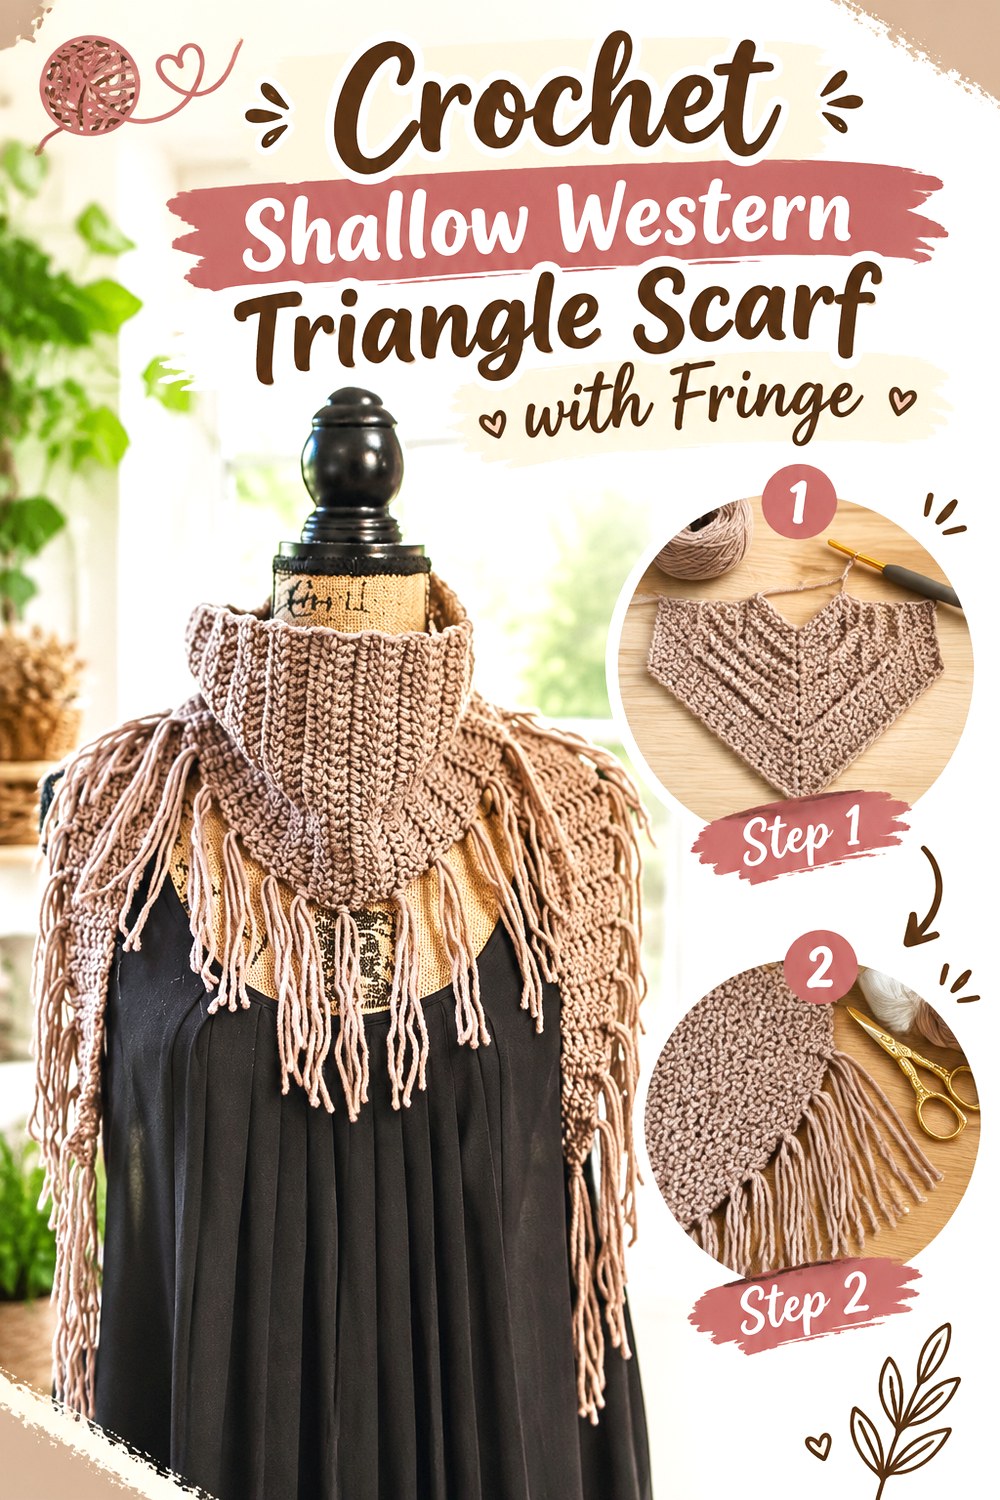
This triangle takes a very different approach to proportion. Salty Pearl Crochet’s Chic Suede design is long from side to side but notably shallow from the top edge to the lower point, creating more of a neck-scarf silhouette than a deep shawl. Fringe runs along the angled portions and reinforces the Western-inspired styling that motivated the design.
The shallow format is useful when you like the visual point of a triangle but do not want a large section of fabric covering the chest. It also gives the fringe greater prominence because the loose strands can be substantial relative to the depth of the crocheted body.
Use the Shallow Depth Deliberately
A shallow triangle sits differently from a conventional shawl. The long side-to-side span provides wrapping room while the center point remains comparatively compact.
If adapting the dimensions, preserve the relationship that attracted you to the design. Increasing depth substantially may turn the finished piece into a different category of scarf, changing both the styling and how much fringe looks balanced.
Let the Fringe Extend the Western Line
On this silhouette, fringe visually continues the downward slope of the scarf. Keep both sides comparable and trim with the scarf hanging rather than relying entirely on a flat tabletop.
Fiber choice can also alter that line. Crisp yarn may produce more separated strands, while softer yarn can create a fuller curtain. Neither is automatically better; choose based on the finish you want.
Original Tutorial and Creator Credit
Creator/Site: Salty Pearl Crochet
11. Crochet Bobble Texture Triangle Scarf with Chunky Tassels

The Ruthie Scarf adds raised texture to the familiar half-granny triangle. Cute As A Button Crochet & Craft alternates double-crochet sections with extended bobble texture, then uses chunky tassels as concentrated accents rather than covering every edge with continuous fringe.
This combination works well when you want the body texture to remain the main attraction. The tassels mark the corners and movement points without creating a full curtain around the triangle. Because bobbles already add volume to the fabric, this restrained fringe strategy can prevent the scarf from becoming visually overloaded.
Let the Bobbles Carry the Visual Weight
Raised stitches cast shadows and create dimension even in a single color. If you introduce a highly variegated yarn, check whether the color changes compete with the bobble pattern.
A quieter yarn can make the texture easier to read, while a busier colorway may produce a more blended surface. Swatch enough fabric to include both the flatter and raised sections before deciding.
Keep the Center Point Easy to Track
A triangle built around a central point depends on consistent placement to remain balanced. The original source specifically notes the usefulness of keeping track of that point during the repeated growth.
If you adapt the project, preserve a clear visual or physical marker until the structure becomes intuitive. Raised texture can make individual spaces slightly harder to read than on a plain granny triangle.
Use Tassels as Punctuation
Corner tassels create focal points rather than a continuous fringe line. Their scale should relate to both the triangle and the bobble texture.
Before making every tassel, attach one temporary sample and view the scarf from several feet away. If it disappears, a fuller tassel may help; if it dominates the whole corner, reduce the volume or length.
Original Tutorial and Creator Credit
Creator/Site: Cute As A Button Crochet & Craft
12. Crochet Shell Texture Rectangular Scarf with Fringe
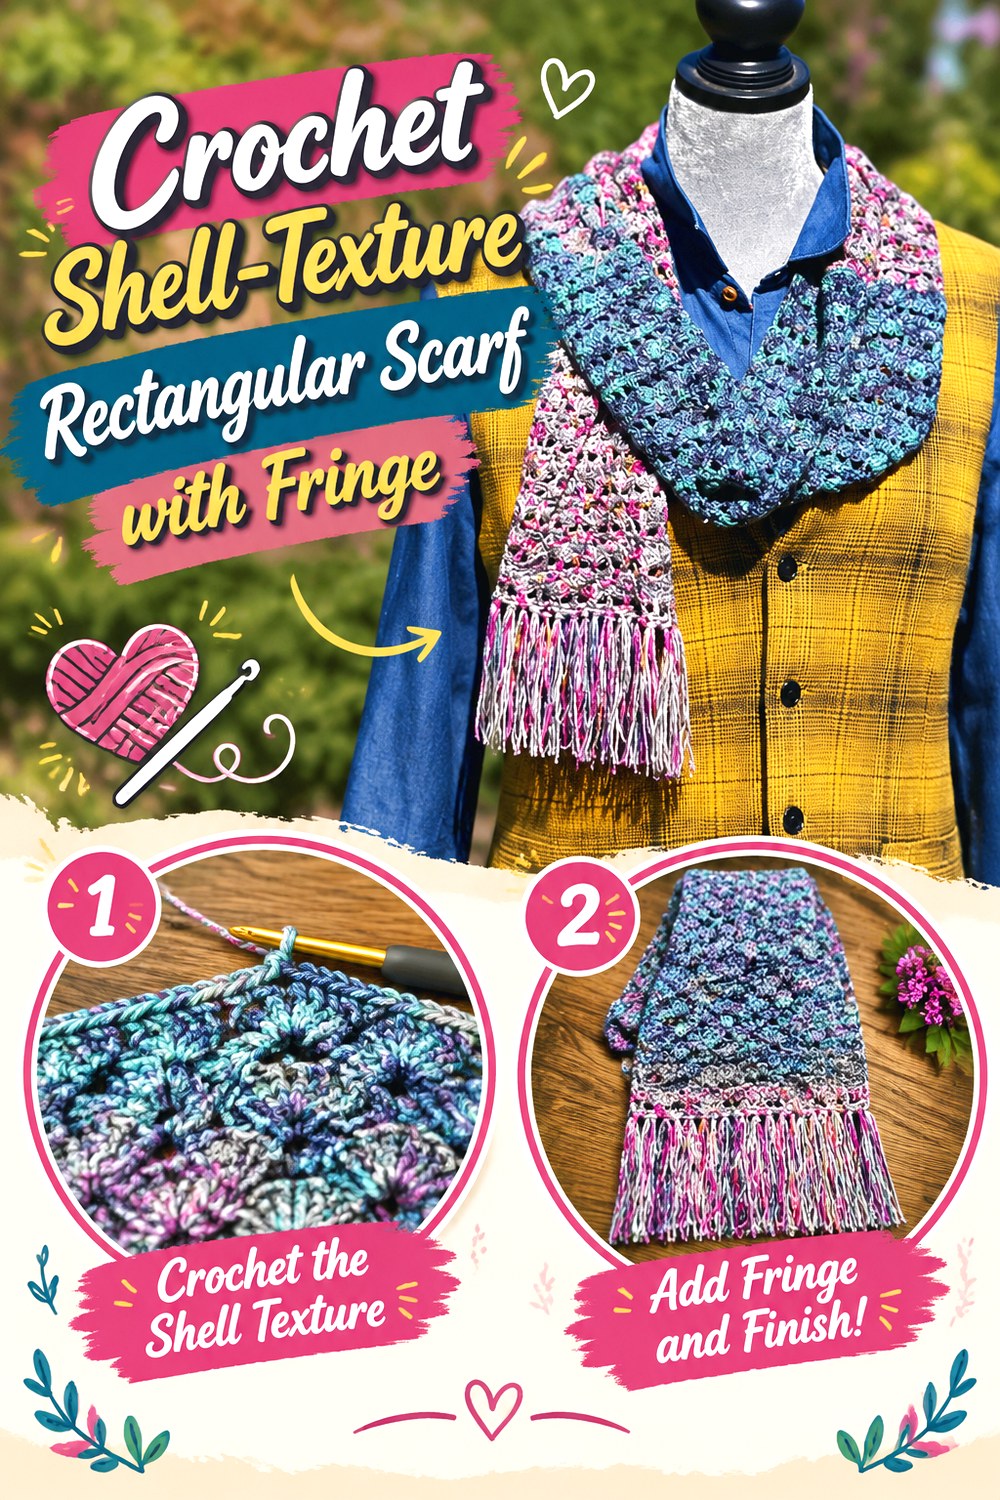
The Prince Edward Island Crochet Scarf from The Crochet Crowd uses a repeating shell-like texture across a classic rectangular form. The design was created with fine specialty yarns and includes additional fringe guidance in the downloadable pattern material, giving the scarf a more refined, textural appearance than a basic solid rectangle.
This option suits readers who prefer a conventional scarf shape but still want a stitch pattern with plenty of surface interest. Because the construction itself remains rectangular, most customization decisions involve length, yarn behavior, color placement, and how prominently the fringe should finish the ends.
Use the Repeat to Showcase the Yarn
A repeating shell texture can interact strongly with multicolored or hand-dyed yarn. Before committing a special skein, make enough fabric to see whether color changes hide or highlight the repeat.
Highly contrasting short color changes may dominate the stitch pattern, while longer transitions can emphasize the length of the scarf. Neither effect is inherently wrong, but it is worth seeing before the scarf grows substantially.
Stabilize the Rectangle Before Fringing
Complete the main fabric and any intended finishing before deciding the final fringe density. Uneven end edges are easier to assess when the scarf is laid flat and the stitch repeat is fully visible.
Fringe can soften minor visual irregularity, but it should not be used to conceal a construction problem that makes one end materially wider than the other. Correct the fabric first where practical.
Original Tutorial and Creator Credit
Creator/Site: The Crochet Crowd
13. Crochet Long Wrap Scarf with Optional Pockets and Fringe
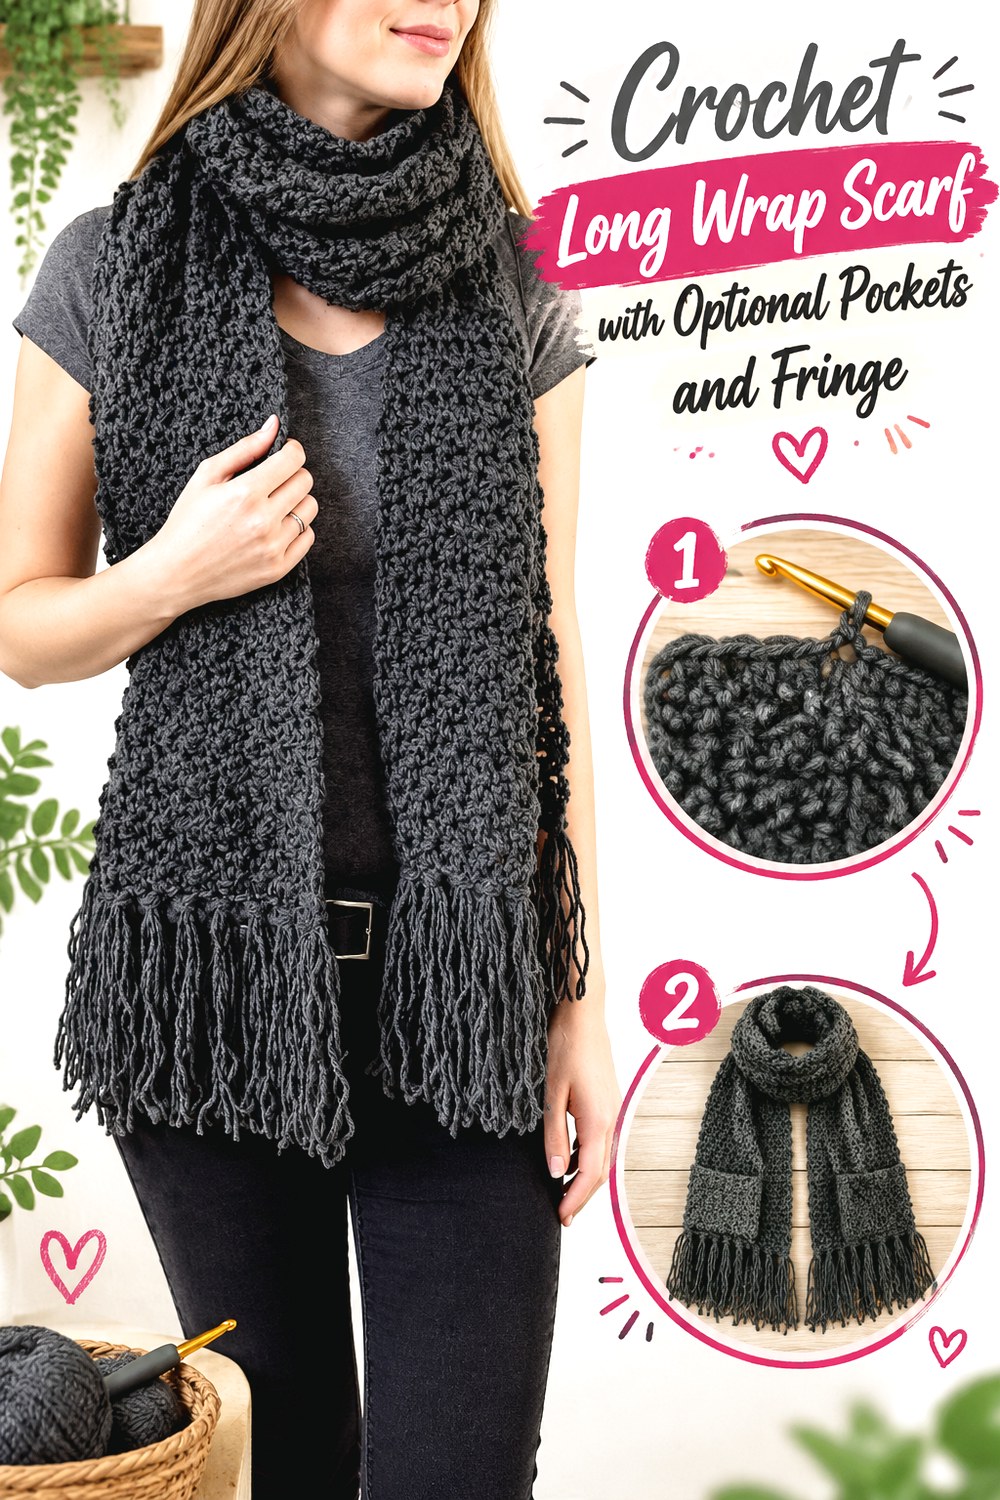
Wilmade’s Awesome Andrea Scarf is a long, one-piece scarf built from a simple alternating texture and finished with fringe at both ends. The design also provides the option of adding pockets, allowing the same basic scarf to move toward a more functional wrap-style accessory.
That optional feature makes this project different from scarves where fringe is purely decorative. Once pockets are added, end length and placement affect where the hands naturally fall, so scarf proportions matter more. The project can also be left without pockets, preserving a conventional long scarf silhouette while retaining the same fringed finish.
Decide on Pockets Before Finalizing Length
Pocket placement is easier to judge when the scarf is actually draped over the intended wearer. What looks balanced flat on a table may place the pockets too high or too low once the scarf sits around the neck.
If you plan to change the scarf length, make that decision before permanently positioning the pockets. Treat the pocket placement as a fit checkpoint rather than an automatic finishing step.
Check the Long-Scarf Proportions in Motion
The source is intentionally long enough for substantial wrapping. Before adding fringe, walk around with the unfinished scarf and see where the ends land after your preferred wrap.
This is particularly useful if you are shorter or taller than the person represented by a standard sample. Comfortable scarf length is a styling preference as much as a measurement.
Keep Fringe and Pocket Openings Visually Separate
When both features are present, avoid allowing an especially long or dense fringe to visually merge with the pocket area. Leave enough distinction that the pocket opening is easy to find.
This is a general adaptation consideration rather than a required construction rule. Test the scarf with the pockets held temporarily in place and the fringe attached loosely before committing to the final finishing.
Original Tutorial and Creator Credit
Creator/Site: Wilmade
14. Crochet Mesh Triangle Hip Scarf with Fringe

For a lighter fashion-focused interpretation, by Kristine’s video teaches a diamond-mesh triangle with a border and fringe, presented as a hip scarf that can work for summer, beach styling, or dance use. The open cotton fabric and long lower fringe make movement a central part of the finished appearance rather than simply an end decoration.
This is the most distinct project in the collection because the intended placement can shift from the neck to the hips. That change affects sizing, tying, and how much fringe movement feels practical. It is a useful reminder that a triangular fringe scarf does not have to be a cold-weather accessory.
Decide Where You Intend to Wear It
Neck and hip styling place different demands on the top edge. If adapting this idea into a neck scarf, check whether the width, ties, and center depth suit that use rather than assuming the original proportions will transfer automatically.
For hip wear, test the top edge around the intended location before finishing all the fringe. The body should sit where you expect without relying on fringe to disguise an unsuitable fit.
Keep the Mesh Consistent
Large open spaces make tension variations highly visible. Count or compare the repeated openings periodically, particularly along the triangle edges.
A small difference in one section may be harmless, but repeated inconsistencies can make the lower edge wander. Once fringe is attached, those changes may become more obvious because every hanging strand emphasizes the shape beneath it.
Remember That Moving Fringe Needs Clearance
Hip-scarf fringe moves more actively than fringe hanging from a stationary scarf end. Consider practical length for walking, sitting, and the activity for which the piece is intended.
If you shorten it, trim only after attaching the full lower fringe and trying the scarf on. This gives a more realistic picture of movement than measuring strands individually on a table.
Original Tutorial and Creator Credit
Creator: by Kristine
How to Choose Between These Crochet Fringe Scarf Styles
Start with shape rather than fringe. Choose Projects 1, 2, 4, 5, 12, or 13 when you prefer the familiar wrapping behavior of a rectangular scarf. Project 6 pushes that shape into deliberately oversized territory, while Project 7 replaces continuous rows with modular granny squares.
For a pointed front, Projects 8 through 11 offer very different triangle proportions—from open V-stitch and deep wrap coverage to a shallow Western-style neck scarf and a bobble-textured tassel design. Project 14 is the strongest choice when movement and warm-weather styling matter more than insulation. Once the shape is settled, compare whether you want loose fringe, decorative knots, tassels, or crocheted chain loops.
Conclusion
Crochet fringe scarves can vary far more than a simple rectangle with yarn tied to each end. Angled shaping makes fringe part of the silhouette, open lace keeps it light, chunky textures make it more substantial, triangles use it to emphasize their points, and granny squares or pockets add an entirely different construction decision.
Choose the body style first, then decide how much movement and visual weight the fringe should contribute. Make temporary fringe samples whenever you are unsure about length or density, especially after changing yarn. For exact stitch placement, shaping, materials, and finishing details, use the original tutorials credited with each project rather than trying to recreate their construction from a roundup.
Frequently Asked Questions
Can I add fringe to almost any crochet scarf?
Usually, provided the edge is stable enough to hold the added strands and the extra weight suits the fabric. Straight rectangular ends are the most straightforward, but triangle edges, motif joins, and lace openings can also provide attachment points.
Avoid assuming more fringe is always better. Test several bundles first, especially on delicate lace or a narrow scarf. If the edge begins stretching, curling, or looking disproportionately heavy, reduce the number of strands, shorten the fringe, or consider spaced tassels instead.
Does fringe have to use the same yarn as the scarf?
No. A contrasting yarn can change color, texture, or movement without altering the scarf body, but the two yarns should still work together visually and practically. A much heavier fringe yarn may pull on a lightweight edge, while an extremely fine substitute may look sparse unless you increase the bundle size.
Also consider care requirements. If the body and fringe use different fibers, follow the most cautious applicable care guidance and check the labels before washing or blocking the finished scarf.
How do I keep crochet scarf fringe looking even?
Attach all or most of the fringe before making the final trim. Hang or lay the scarf in the position that best reflects how it will be worn, then straighten the strands gently and trim in small amounts.
A rigid ruler can help with a straight fringe line, but angled triangle edges may look better when judged according to the scarf silhouette. Remember that some yarns relax or change after appropriate washing, so complete any creator-recommended finishing before making an extremely precise final cut.
Should triangle scarves have fringe on every edge?
Not necessarily. Fringe is commonly placed along the two lower angled edges, concentrated at the corners as tassels, or omitted entirely. Adding it along the top edge can create extra bulk where the scarf sits against the neck and may not suit the design.
Use the triangle’s purpose as the deciding factor. A dramatic wrap can carry substantial fringe, while a shallow neck scarf may need only restrained side fringe or a few corner accents.
Can I substitute a different yarn in these scarf tutorials?
Often, but substitution can change dimensions, drape, openness, fringe weight, and stitch definition. Match yarn weight only as a first check; fiber, twist, loft, and your own tension also matter.
Make a useful swatch before committing, particularly for lace, fuzzy yarn, or a project where finished width affects wrapping. If the original tutorial gives gauge, sizing, or specific substitution advice, use that information rather than assuming the new yarn will produce identical results.
How much extra yarn should I save for fringe?
There is no reliable universal amount because fringe requirements change with strand length, bundle size, spacing, scarf width, and whether you use tassels, knots, or crocheted chains. Follow the original tutorial when making the design as written.
For an adaptation, make one representative fringe bundle first. Measure or weigh the yarn it uses, count approximately how many attachment points you intend to fill, and use that only as a planning estimate. Reserve additional yarn for trimming and minor adjustments.