Crochet cardigans can look similar on a hanger while behaving very differently once worn. A top-down raglan follows the shoulders differently from a roomy hexagon cardigan; chunky ribbing creates more structure than open mesh; and granny-square construction introduces joins and motif placement that continuous fabric does not. Closure style, sleeve shape, length, and yarn weight also change how useful the finished layer feels.
These 10 crochet cardigan ideas cover relaxed hexagons, buttoned raglans, open mesh, fitted granny squares, chunky ribbing, batwing sleeves, stripes, a hooded design, a cropped tie front, and a bomber silhouette. Use the comparisons below to choose the construction that suits your wardrobe, then check fit and fabric behavior before committing to the full garment.
Quick List
- Crochet Granny Hexagon Layering Cardigan
- Crochet Top-Down Raglan Button Cardigan
- Crochet Airy Mesh Tie-Front Cardigan
- Crochet Fitted Granny Square V-Neck Cardigan
- Crochet Chunky Ribbed Button Cardigan
- Crochet Relaxed Batwing Cardigan
- Crochet Oversized Striped Moss-Stitch Cardigan
- Crochet Hooded Granny-Stitch Pocket Cardigan
- Crochet Lightweight Cropped Tie-Front Cardigan
- Crochet Super-Chunky Bomber Cardigan
Choose the Cardigan Shape Before Choosing the Stitch
Construction has a larger effect on fit than surface texture alone. Hexagon and batwing cardigans naturally create roomier shapes because several garment dimensions develop together. A top-down raglan gives you a clearer opportunity to judge the neckline, shoulder area, and upper-body depth before the entire body is finished. Modular granny-square designs depend more heavily on the dimensions of the individual motifs and the way those motifs form the front and back.
Length matters too. A cropped cardigan puts more visual emphasis on the waist and closure, while a longer or oversized layer has more fabric hanging from the shoulders. A bomber depends on the relationship between its fuller body and shorter hem. Choose the silhouette first, then decide whether dense texture, openwork, stripes, or motifs support the way you intend to wear it.
Yarn Weight and Drape Can Change the Whole Silhouette
Thicker yarn generally creates more physical volume, so a chunky cardigan can feel substantially different from the same broad shape made in a lighter fabric. Dense ribbing may emphasize structure, while open mesh and looser stitch patterns can produce a softer, more fluid layer. Neither result is automatically better; the right choice depends on whether you want warmth and definition or lighter layering.
Avoid replacing the tutorial yarn with a dramatically different weight and assuming the same sizing will result. Gauge, stitch density, sleeve weight, front-edge behavior, and overall length can all change. Make a useful swatch in the actual stitch pattern and treat the fabric—not the yarn label alone—as your decision point. If the swatch already feels stiff or heavy, a full cardigan will magnify that characteristic.
Fit Checkpoints That Matter Before Final Seams
A cardigan needs enough room for both the wearer and the intended underlayer. Compare the tutorial’s finished measurements with your body measurements and, when possible, with a cardigan you already like wearing. Check shoulder placement, chest or bust ease, armhole depth, sleeve length, and the point where the hem should fall.
For joined constructions, compare matching pieces before permanent assembly. For a top-down cardigan, try the growing upper section on before investing heavily in body length. Front bands and ribbing should also be checked before every end is secured because a tight border can pull inward while an overly relaxed border can flare. Cardigan planning is more reliable when body measurement, intended ease, panel width, armhole depth, garment weight, shoulder stretch, drape, and edging tension are considered together instead of relying on a universal size formula.
1. Crochet Granny Hexagon Layering Cardigan
 SAVE
SAVEA granny hexagon cardigan takes a geometric route to garment making: expanding crochet shapes are folded and joined so they begin to form the body and sleeves. The Hooks and Heelers tutorial shows this recognizable construction along with sleeve development, assembly, and ribbed finishing. The resulting style has a relaxed, open-front character that works especially well when you want color changes or granny-style texture to remain visible.
Its main planning challenge is that the hexagon does not grow in only one direction. Increasing the piece can affect body room, sleeve dimensions, and length at the same time, so judge the folded shape repeatedly rather than focusing on only one measurement.
Let the Hexagon Grow Without Losing Sleeve Proportion
Fold the growing piece into its garment position periodically and compare it with your arm and upper body. If you continue enlarging solely because the body needs more width, the sleeve portion may also become larger than intended. Before making a major adjustment, identify which measurement is actually short and check how the tutorial handles that area independently.
Color Changes Become Part of the Geometry
Striping in a hexagon radiates through the garment differently from ordinary horizontal cardigan stripes. Lay the planned colors together before beginning and consider which shades you want closest to the face, cuff, and outer edge. Frequent changes also create more yarn ends, so a highly varied palette brings a finishing trade-off that a simpler two- or three-color plan avoids.
Finish the Front Edge Only After a Try-On
A substantial front border can change how an open hexagon cardigan hangs. Before committing to deep ribbing or another heavy finish, try the assembled body over the type of shirt you expect to wear underneath. Check whether the fronts already meet, overlap, or sit widely apart. The edging should support that intended look rather than unexpectedly changing it.
Original Tutorial and Creator Credit
Creator: Annie | Hooks and Heelers
2. Crochet Top Down Raglan Button Cardigan
 SAVE
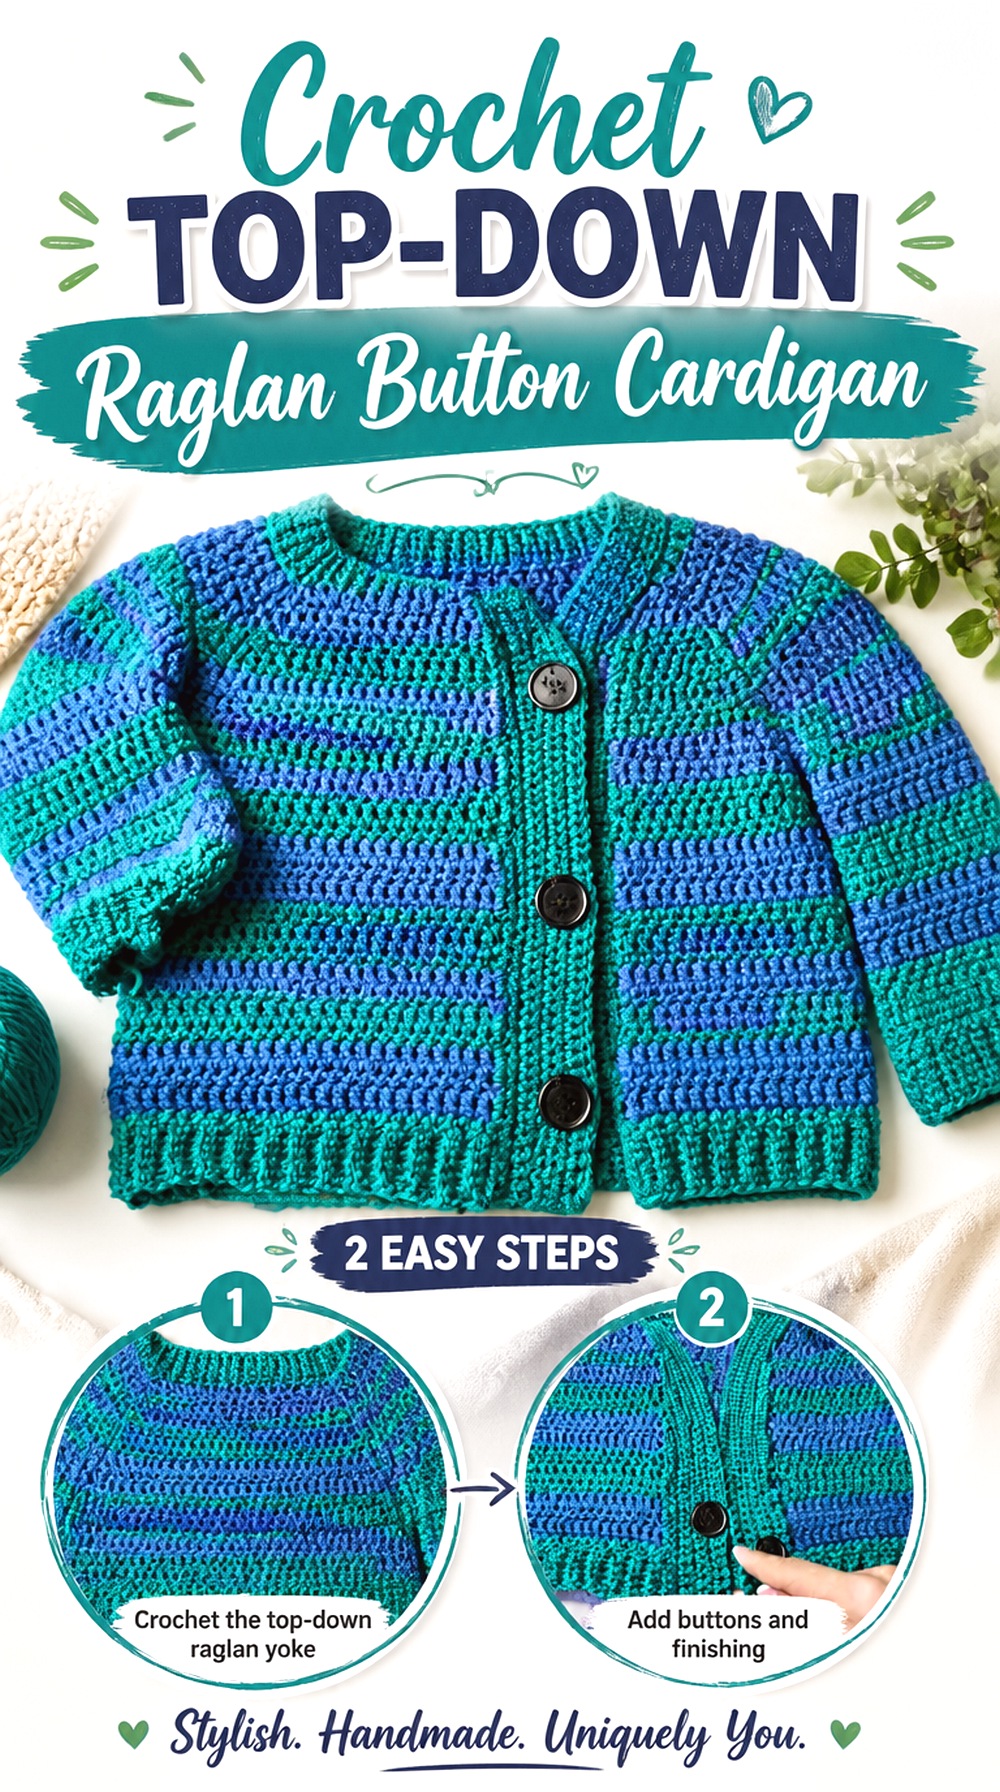
SAVEA top-down raglan cardigan starts around the upper body and expands before the sleeves and torso become separate sections. By Kristine’s tutorial demonstrates this approach with a buttoned front, cuffs, hem finishing, and a largely seamless body construction. Because the upper cardigan exists early in the project, this style offers useful opportunities to judge neckline position and upper-body fit while changes are still manageable.
Compared with the looser hexagon design, the raglan structure places more attention on how the yoke sits around the shoulders and underarms. It suits readers who prefer a conventional cardigan outline with a defined button front rather than a wide, draped opening.
Use the Raglan Yoke as the First Fit Gate
Do not wait until the cardigan reaches its full length to evaluate fit. Once the yoke has enough structure to sit around the upper body, check neckline comfort, front placement, underarm depth, and whether the fabric reaches the body without being stretched. A yoke that is too shallow or excessively deep can affect both the torso and sleeve position later.
Keep Button Bands Flat Against the Front
Button bands need enough stability to support the closure without drawing the cardigan inward. Before attaching buttons permanently, lay the cardigan flat and check that both fronts have similar finished lengths. Then try it on and observe whether the band waves, pulls, or twists. Fixing uneven edging tension is easier before buttons turn small alignment errors into visible closure problems.
Recheck Sleeve Room After Separation
Raglan sleeves can look roomy while still attached to the growing yoke, so assess them again once the body and sleeves are divided. Check upper-arm comfort over the intended underlayer and move your arms forward and upward. A cardigan planned for a winter shirt needs different functional room than one worn over a thin tank.
Original Tutorial and Creator Credit
Creator: by Kristine
3. Crochet Airy Mesh Tie Front Cardigan
 SAVE
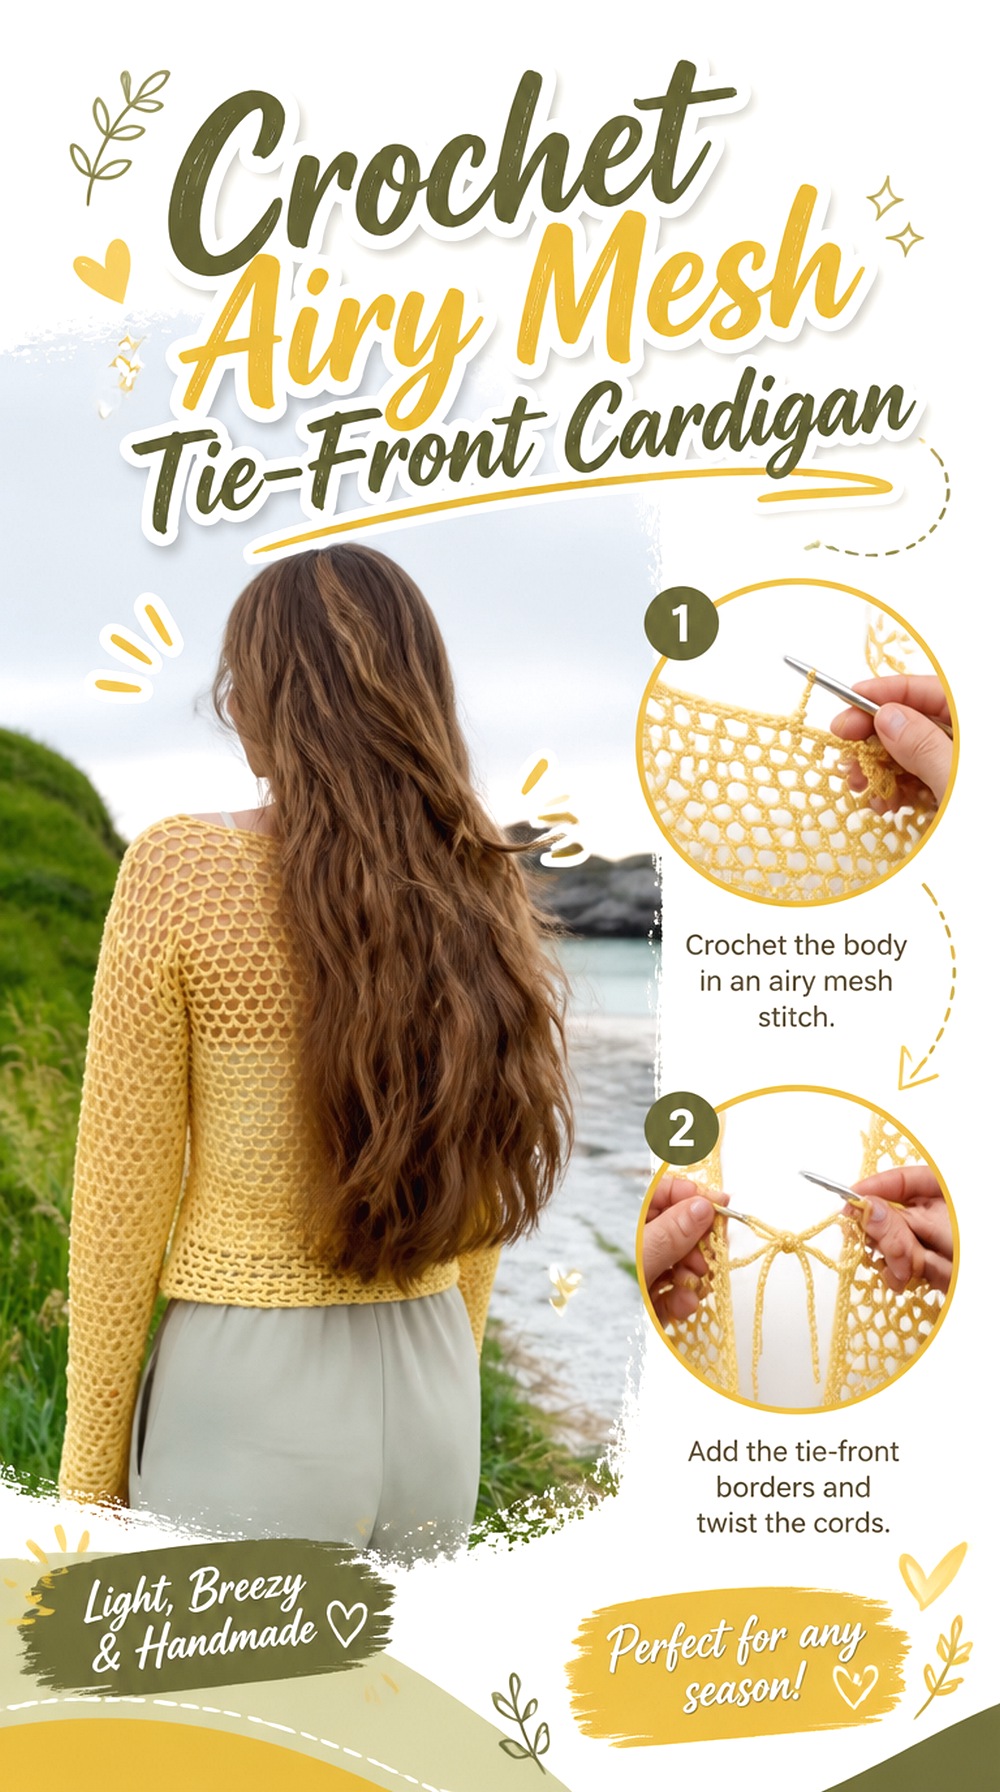
SAVEFor a lighter layer, this mesh cardigan replaces dense fabric with an open surface and a simple tie-front detail. Crochet with Linni’s tutorial focuses on a mesh cardigan that can be sized around the wearer and includes the main shaping, panel assembly, and front ties. The visible openness makes it a very different wardrobe piece from the chunky or ribbed options in this collection.
A mesh cardigan works well when the garment is meant to reveal the layer beneath it rather than provide full coverage. That makes the planned camisole, dress, swimsuit, or top part of the fit decision instead of an afterthought.
Judge Mesh Coverage Over the Intended Layer
Open fabric can appear modest when lying flat and considerably more revealing once stretched over the body. Test the stitch pattern over the color and type of underlayer you actually plan to wear. Also check the armhole and side areas while moving. Choosing the underlayer early makes it much easier to decide whether the mesh density suits the intended setting.
Watch for Vertical Growth in Open Fabric
Open crochet may relax under the weight of a full garment, depending on fiber, gauge, and stitch structure. Wash the swatch according to its yarn-care instructions and observe whether it becomes longer or more open. On a tie-front cardigan, unexpected growth can alter both hem placement and the point where the ties meet, so evaluate those features together.
Original Tutorial and Creator Credit
Creator: Crochet with Linni
4. Crochet Fitted Granny Square V Neck Cardigan
 SAVE
SAVEBriana K’s granny-square cardigan combines modular motifs with a more fitted V-neck silhouette and ribbed finishing. That combination gives the garment much more structure than a loose festival-style granny cardigan: square dimensions control the grid, while the neckline and borders help turn the motifs into a conventional wearable shape.
This option makes sense when the motifs themselves are a major part of the design rather than merely a decorative accent. It also requires more pre-assembly planning. A small difference between blocked square sizes can multiply across a panel, and the joins become visible structural lines throughout the finished cardigan.
Block the Squares Before You Trust the Grid
Measure motifs after they have been prepared in the way you intend to finish the cardigan. Squares that look nearly identical straight from the hook may settle to slightly different dimensions. Lay several together before joining and confirm that their corners, edges, and centers align without forcing them. Correcting the motifs first is cleaner than asking the seams to disguise inconsistent sizing.
Keep the V-Neck Border From Pulling Inward
A V-neck edging needs to follow two angled fronts and the back neckline without behaving like a tight cord. Before fastening off the final border, place the cardigan on the body or a form and inspect the V from both front and side. If the front edges curl toward the chest or flare away from it, check border tension before assuming blocking will solve the problem.
Protect the Shoulder Joins From Uneven Stress
The shoulders carry the weight of all the motifs below them. When the squares are ready for assembly, make sure corresponding front and back pieces have compatible dimensions and that the joins do not concentrate tension at just a few points. A neat-looking motif layout can still hang unevenly if one shoulder connection is tighter than the other.
Original Tutorial and Creator Credit
Creator: Briana K
5. Crochet Chunky Ribbed Button Cardigan
 SAVE
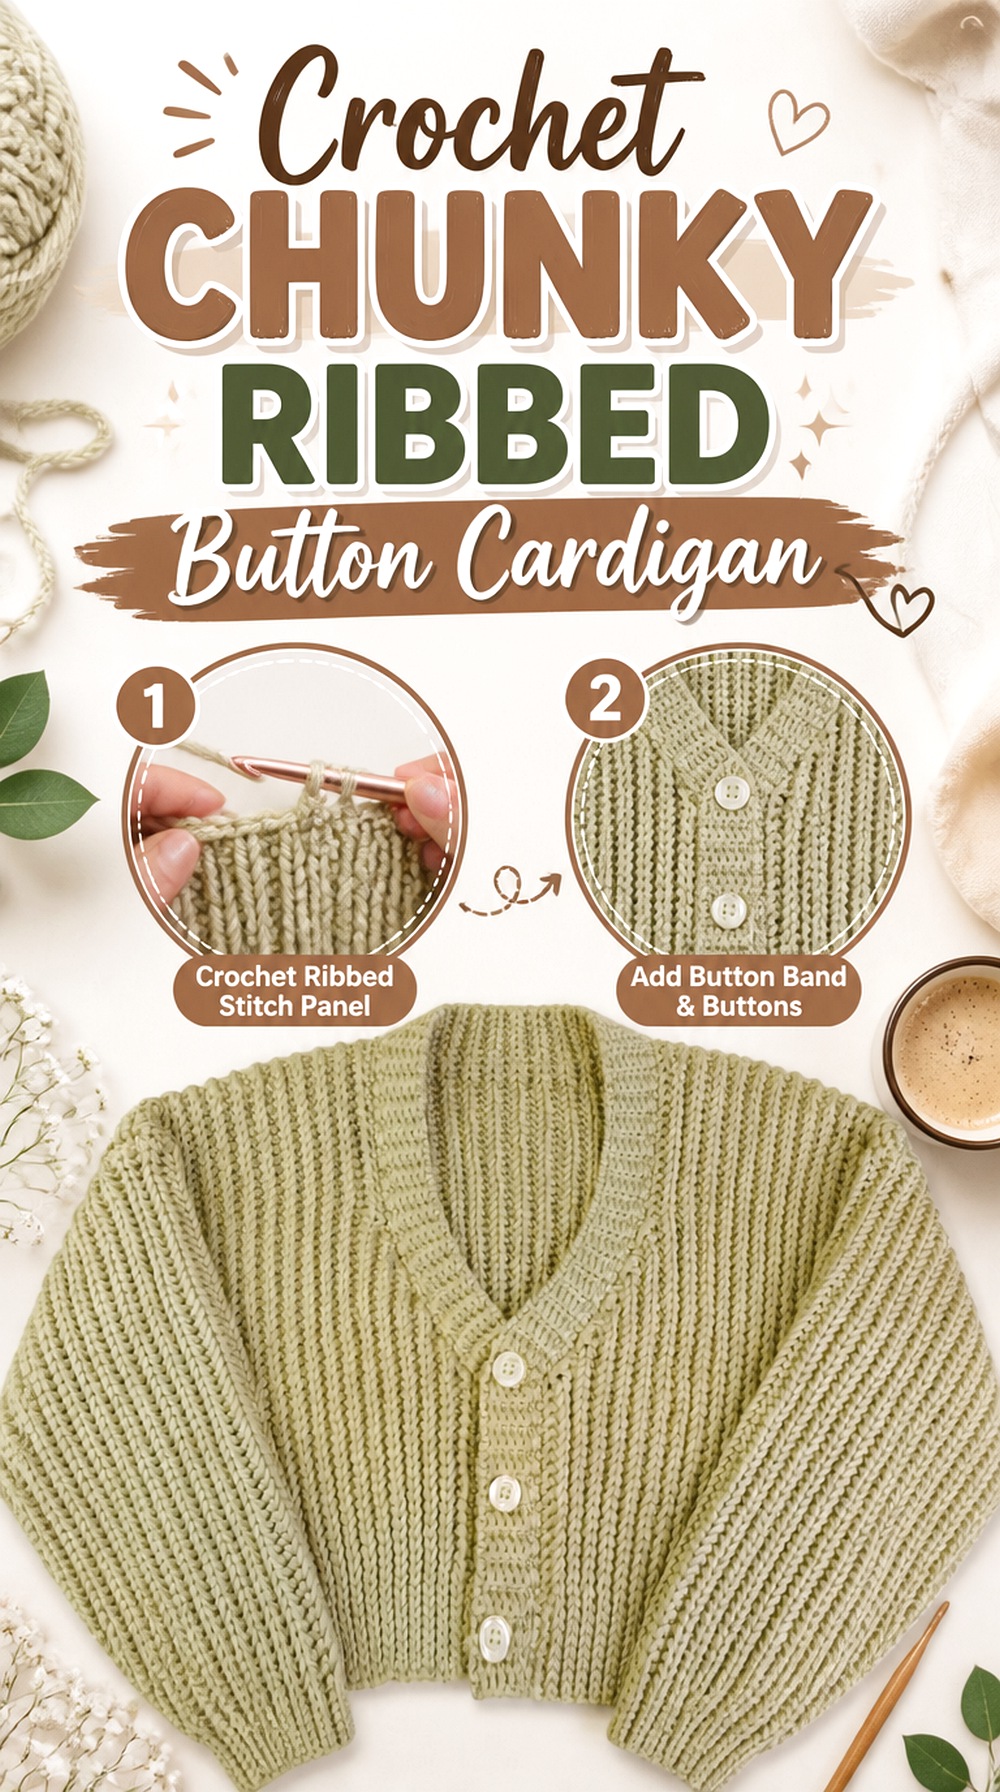
SAVEThe Chenda DIY tutorial centers on a chunky cardigan with pronounced ribbed texture and a button front. Compared with mesh or granny-square fabric, the thicker surface gives this cardigan a more substantial appearance, making the fabric itself one of the main design features. The buttons also provide a clearer closed-front option than the open hexagon or tie-front ideas.
Because chunky yarn creates depth quickly, it deserves a realistic fabric check before the body is large. A rib texture that looks appealing in a small sample can become quite thick around folded edges, cuffs, front bands, or seams.
Thick Ribbing Changes More Than Texture
Work enough of the main fabric to judge its thickness as well as its gauge. Fold the swatch to imitate a cuff or front edge and consider whether that amount of bulk feels comfortable. If the cardigan is intended for indoor layering, a very dense fabric may be more substantial than needed even when its measurements are technically correct.
Place the Buttons With the Cardigan on the Body
Button spacing can look balanced on a table but sit differently once the cardigan is worn. Temporarily mark the intended positions and close the fronts over the real underlayer. Check whether the closure causes pulling across the chest or leaves the lower front hanging unevenly. Permanent button placement should follow the worn garment rather than an abstract visual interval alone.
Original Tutorial and Creator Credit
Creator: Chenda DIY
6. Crochet Relaxed Batwing Cardigan
 SAVE
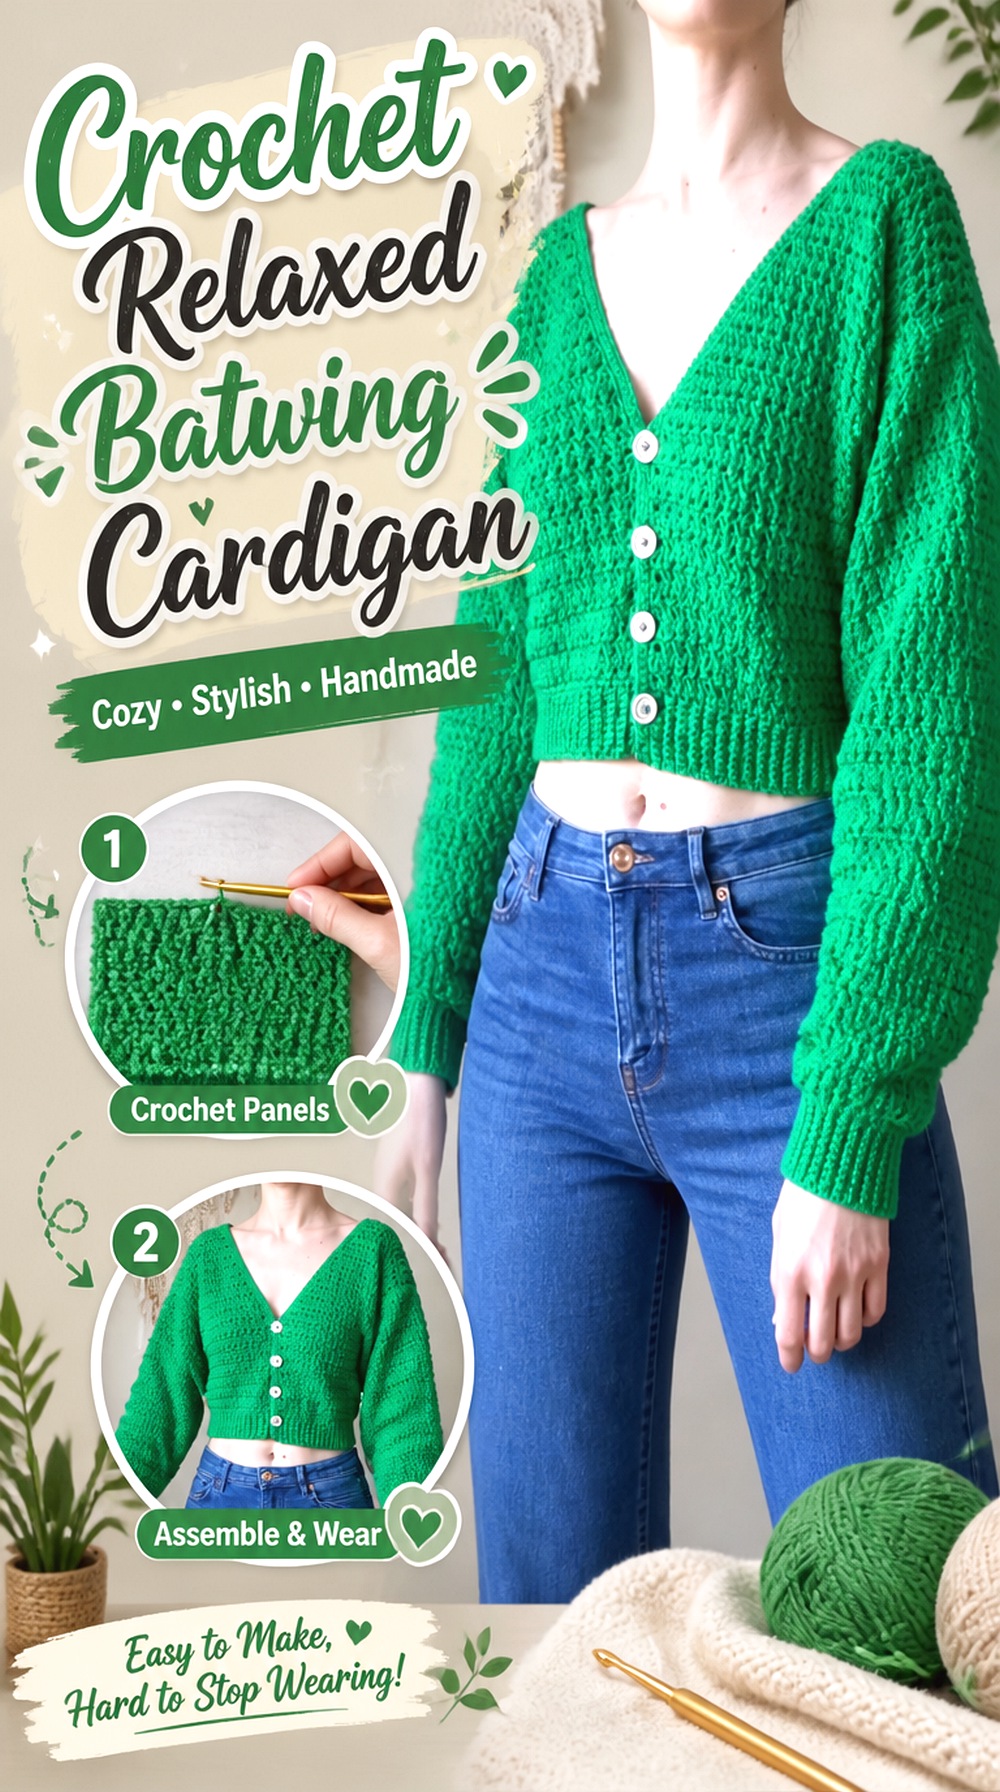
SAVEA batwing cardigan changes the usual relationship between body and sleeve. Shirleyrosey’s tutorial shows a chunky cardigan with broad batwing-style sleeves and a relaxed overall silhouette, creating a layer that feels intentionally roomy rather than closely shaped through a conventional armhole.
This style is useful when you like dramatic sleeve room or want a cardigan that can sit over looser tops. The trade-off is that width at the upper body affects the whole visual shape. Extra fabric that looks casual around the arm can become overwhelming if the torso, sleeve drop, and overall length are all enlarged at once.
Batwing Width Controls the Relaxed Look
Judge the cardigan with your arms both down and extended. A batwing shape should have enough fabric to create its characteristic drape without making normal movement cumbersome. Compare the developing width with a loose cardigan or sweater you already wear rather than assuming that more fabric automatically creates a better oversized fit.
Balance Both Sides Before Closing the Seams
Broad sleeve constructions make small length differences more visible because each side extends farther from the body. Lay matching sections together before final assembly and compare both the outer sleeve edge and the body edge. If one side has relaxed more than the other, correct that imbalance before a seam locks it into the garment.
Keep the Front Opening Light Enough to Drape
A relaxed batwing cardigan already carries significant visual volume around the upper body. A very thick front border can make that area feel even heavier. Test the edging on a partial section first if you are changing the tutorial yarn or finish, and check whether the fronts fall vertically instead of rolling outward.
Original Tutorial and Creator Credit
Creator: Shirleyrosey
7. Crochet Oversized Striped Moss Stitch Cardigan
 SAVE
SAVEBloodimaryart Crochet’s striped cardigan combines an oversized shape with moss-stitch texture and clearly defined color bands. The tutorial covers separate body sections, joining, sleeves, and front finishing, so the finished piece has the familiar proportions of a paneled cardigan rather than the radial geometry of a hexagon.
Stripes add a second planning problem beyond fit: each panel has to look intentional beside the others. The colors do not need to mirror perfectly, but their placement should be decided before a major panel is complete if you want the fronts, back, and sleeves to feel related.
Map the Stripe Rhythm Before the Full Panels
Arrange the yarn colors in order and photograph or write down the sequence before you work deeply into the garment. Think about where strong contrast will land around the chest, cuffs, and hem. If one color is limited, reserve it for the places where its repetition matters most instead of discovering midway that the second sleeve cannot match the first.
Make the Two Front Edges Visually Agree
Oversized cardigans can tolerate generous ease, but mismatched front lengths remain obvious. Before finishing the shoulder and front sections, place both fronts beside each other and compare their total length, stripe placement, and relaxed edge tension. A small mismatch is easier to correct at this stage than after a border draws attention to both sides.
Original Tutorial and Creator Credit
Creator: Bloodimaryart Crochet
8. Crochet Hooded Granny Stitch Pocket Cardigan
 SAVE
SAVEThis hooded cardigan from MJ’s Off The Hook Designs adds features that most of the other ideas leave out: a hood, button front, pockets, ribbed bands, and granny-stitch fabric worked from a top-down foundation. Those elements turn it into a more fully featured outer layer rather than a simple open cardigan.
The extra components also interact. A hood puts additional fabric at the back neckline, pockets add localized weight to the fronts, and buttons ask the front band to stay stable. It is therefore worth evaluating the cardigan as a complete system rather than treating each added feature as decoration.
A Hood Changes the Neckline Load
Before the hood is fully finished, check how the neckline sits without forcing it backward. The hood should not make the front edges creep toward the neck or cause the back to sag noticeably. Fiber choice matters here because a yarn that stretches easily under weight may behave differently once the hood has its full mass.
Test Pocket Height With Your Hands in Place
Pocket placement should make sense on the wearer’s torso, not just match the visual midpoint of the cardigan front. Temporarily secure both pockets, put the cardigan on, and place your hands naturally inside them. Check symmetry in a mirror and make sure the pocket weight does not pull the surrounding granny fabric out of shape.
The Front Band Has Several Jobs at Once
On this cardigan, the front finishing supports the visual edge, button placement, and the transition toward the hood. That makes even tension especially important. Lay both fronts flat before hardware is attached and make sure they are comparable in length. Then try the cardigan closed so you can see whether the band supports the features without puckering.
Original Tutorial and Creator Credit
Creator: MJ’s Off The Hook Designs
9. Crochet Lightweight Cropped Tie Front Cardigan
 SAVE
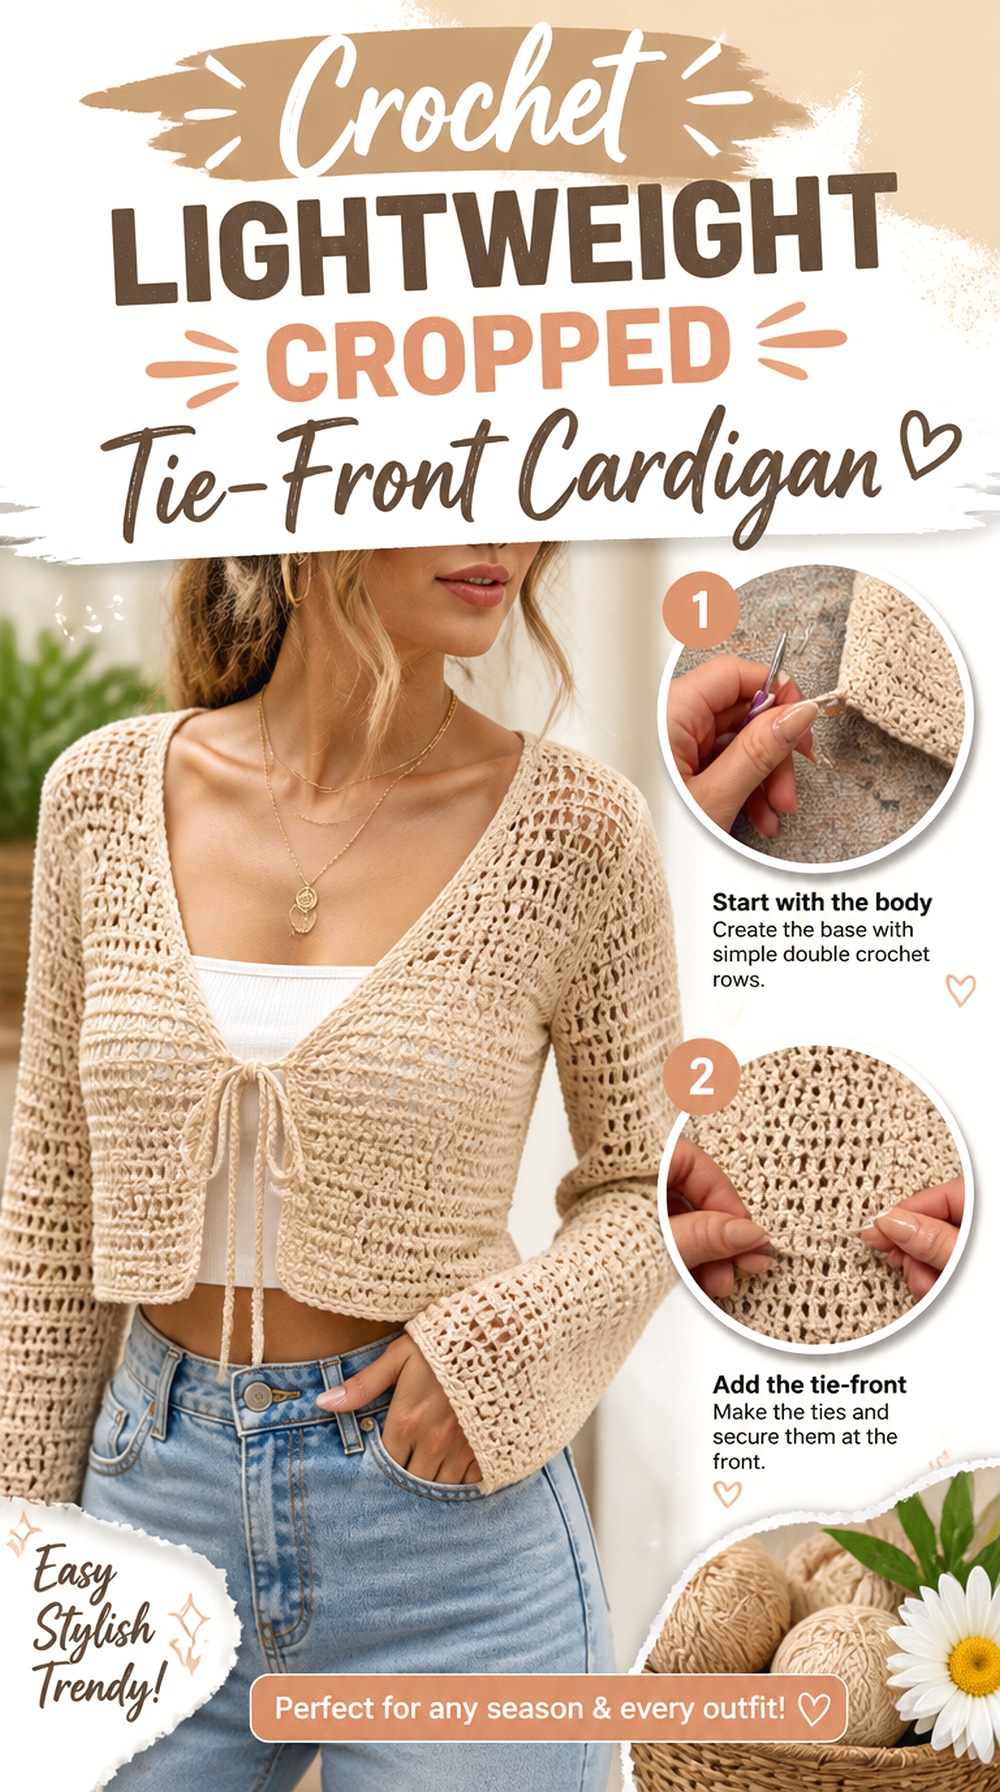
SAVEDana B’s cardigan tutorial supports a lightweight, cropped cardigan with a simple tie-front treatment. The shorter body and minimal closure make it noticeably different from a buttoned everyday cardigan: rather than providing full coverage, it works as a small layering piece that leaves more of the outfit visible.
This is a style where a few inches of visual placement can matter more than they do on an oversized cardigan. The hem needs to relate to the wearer’s torso and waistband, while the ties need to meet naturally without forcing the front panels together.
Decide Exactly Where the Cropped Hem Should Sit
Compare the developing body with the trousers, skirt, or dress you plan to pair with it. Check the hem with arms relaxed and raised because a crop that seems well positioned while standing still may expose more than intended during movement. If you change the tutorial length, make that decision before a finishing edge adds its own depth.
Tie Placement Controls How the Front Closes
A tie-front cardigan does not need the same overlapping room as a traditional buttoned front, but the ties should meet without pulling the neckline downward or stretching the front corners. Temporarily mark the attachment points and test the closure while worn. If the fronts need significant force to meet, revisit cardigan width rather than expecting the ties to correct the fit.
Original Tutorial and Creator Credit
Creator: Dana B
10. Crochet Super Chunky Bomber Cardigan
 SAVE
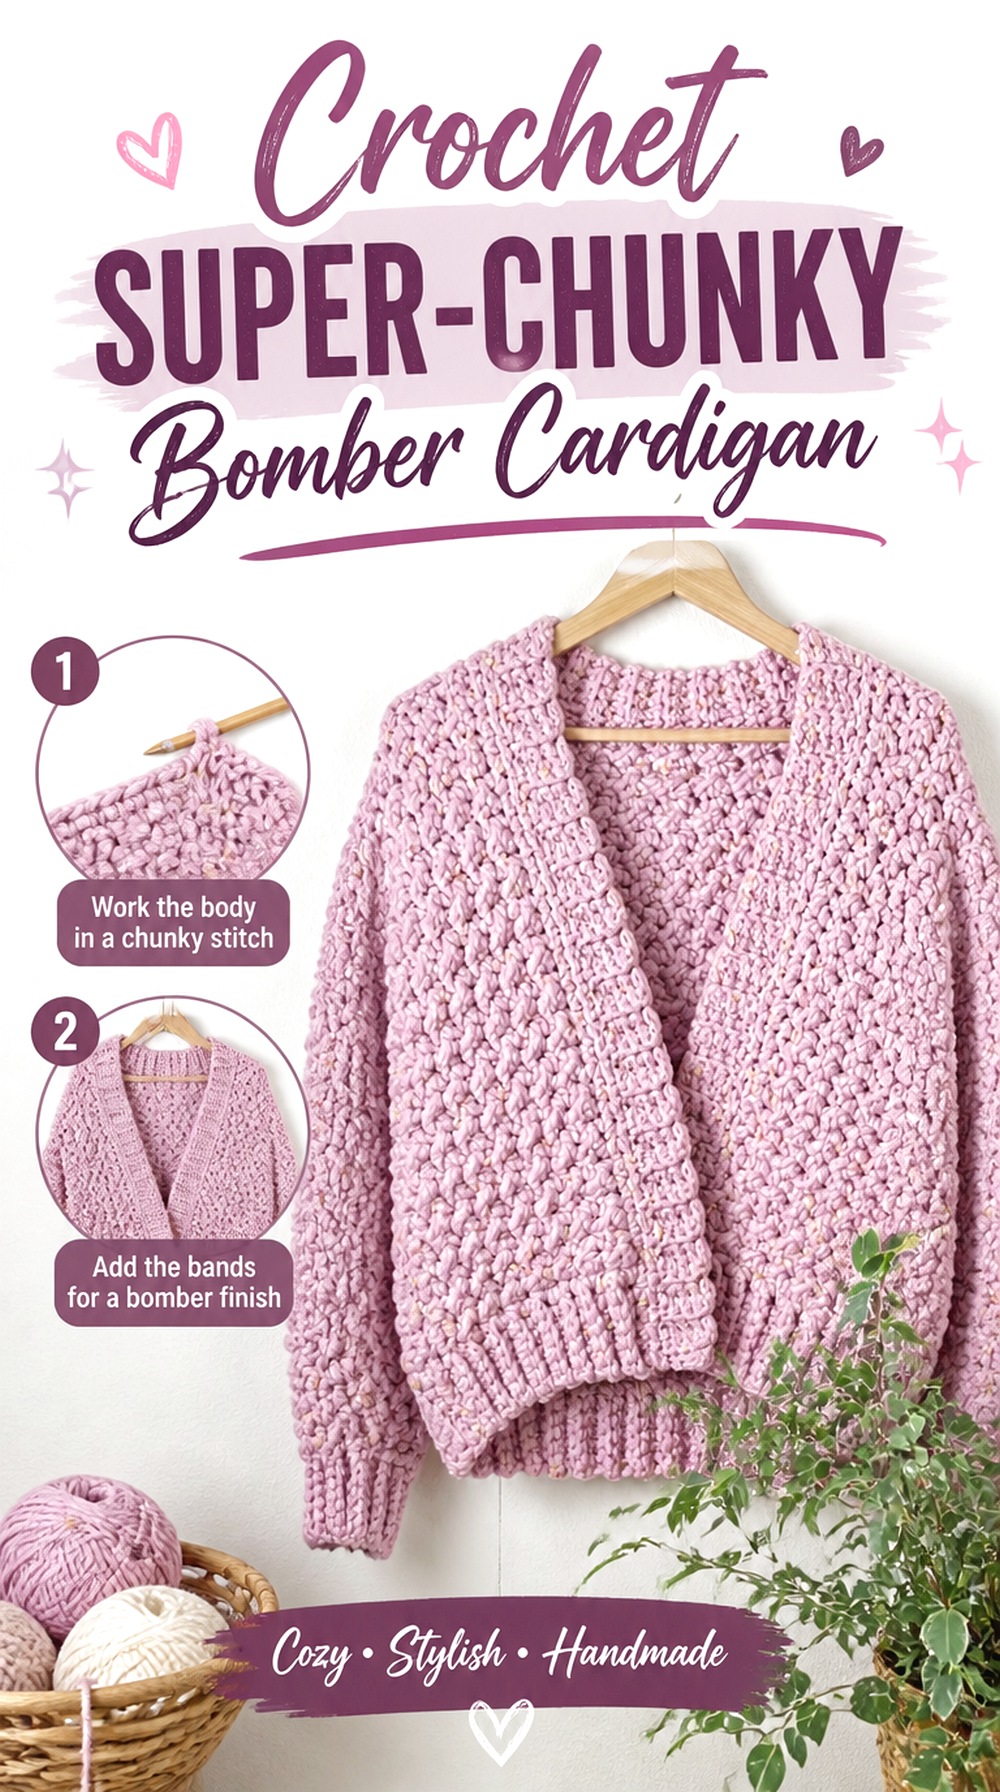
SAVEHey Carrie’s bomber cardigan takes the collection in a more jacket-like direction. The design uses very thick yarn, separate body pieces, and ribbed finishing to create a short, oversized bomber silhouette rather than a long draped cardigan. The dense scale of the stitches makes the shape itself prominent, so hem, cuffs, seams, and layering room deserve as much attention as the decorative surface.
This is a useful choice when you want crochet to function visually like a substantial outer layer. It is less suited to someone looking for the fluid movement of mesh or a lightweight granny cardigan.
A Bomber Hem Needs Enough Stability
The lower edge helps create the characteristic bomber shape, so evaluate the relationship between the wider body and the finished hem before fastening off. An overly tight band can cause exaggerated bunching, while an overly loose one can make the garment read more like a straight cardigan. Check the hem while wearing the project over its intended layer.
Bulky Seams Can Change the Jacket Shape
Super-thick fabric already carries substantial depth, and a heavy seam can add even more at the shoulders and sides. Before final joining, align the panel edges carefully and avoid pulling the seam tighter than the surrounding fabric. Turn the assembled section both right-side-out and inside-out to check whether the joining ridge is changing the silhouette.
Layering Room Matters More in a Short Jacket
A short cardigan may need less body length, but it still needs enough room through the chest, upper back, and armholes for whatever sits underneath. Test it over a realistic shirt or sweater before finishing the cuffs and bands. An intentionally oversized bomber should still allow easy movement without requiring the crochet fabric to stretch constantly across the body.
Original Tutorial and Creator Credit
Creator: Hey Carrie
Which Crochet Cardigan Style Fits Your Goal?
For a light layer that keeps the outfit underneath visible, the mesh tie-front and lightweight cropped cardigan reduce visual bulk. The top-down raglan is a stronger choice when you want to assess upper-body fit during construction, while the hooded granny-stitch cardigan adds the most obvious functional extras with its hood, pockets, buttons, and ribbing.
Choose the hexagon or fitted granny-square cardigan when the crochet construction itself should be a major visual feature. For greater volume, the batwing and oversized striped cardigan lean into relaxed silhouettes. The chunky ribbed design gives you a substantial buttoned layer, while the super-chunky bomber creates the shortest, most jacket-like profile in the collection.
Conclusion
The most useful way to choose among these crochet cardigan ideas is to start with construction and fit rather than color alone. Pick mesh or a cropped tie front for lighter layering, granny squares or hexagons when you want modular crochet to stay visible, a raglan when upper-body fit is a priority, or chunky and bomber shapes when you want more substantial fabric.
Whichever silhouette you choose, check the intended underlayer, fabric drape, shoulder placement, sleeve room, and front finishing before making irreversible adjustments. Use the original tutorials near each project for their exact construction details, then apply the fit and material checkpoints here to decide whether that particular cardigan belongs in your wardrobe.
Frequently Asked Questions
Which crochet cardigan construction is easiest to adjust while I am working?
Top-down constructions can make some fit decisions easier to inspect because the upper cardigan develops before the full body is completed. Hexagon cardigans also allow frequent visual checks once the pieces can be folded into their garment shape. Neither method eliminates sizing work, however. Follow the selected tutorial’s construction logic and compare the growing piece with actual finished measurements instead of assuming one method automatically fits everyone.
How do I choose between a fitted and oversized crochet cardigan?
Start by comparing the finished measurement with your body measurement and with a cardigan whose fit you already like. The difference creates ease. A fitted granny-square cardigan may need more precise shoulder and front alignment, while an oversized design can use more room without being shapeless. Also consider the intended underlayer: the same cardigan may feel relaxed over a tank and restrictive over a sweatshirt.
Can I use a different yarn weight for one of these cardigan tutorials?
A small substitution may still require a new gauge check, while a major weight change can alter nearly every important property of the garment. Width, row length, stitch definition, drape, seam bulk, sleeve weight, and yarn requirements can all change. Swatch the proposed yarn in the tutorial’s main fabric and compare the result with the creator’s required gauge and intended texture before committing to a full cardigan.
Should granny squares be blocked before joining a cardigan?
Blocking or otherwise preparing motifs to their intended finished dimensions makes layout planning much more reliable. Compare several squares after that process and make sure their sides and corners align without stretching one motif to meet another. Joining inconsistent squares can create rippled seams, uneven shoulders, or front panels with different lengths. Always choose a blocking method that is appropriate for the fiber.
Why do the front edges of my crochet cardigan flare or ripple?
Uneven edging tension is a common cause. Too many stitches along the border can create a wavy front, while too few can pull the opening inward. Panels that have grown to different lengths can produce a similar effect. Lay both fronts flat and compare them before adding more finishing. Appropriate blocking can improve minor tension differences, but it will not reliably correct a significant sizing or stitch-count mismatch.
How can I keep crochet cardigan sleeves from becoming too long?
Measure sleeves from the shoulder position created by the actual construction, not from an unrelated clothing size chart. Dropped shoulders, batwings, raglans, and hexagon cardigans place the sleeve start in different locations. Try the garment on before adding a deep cuff whenever the construction allows it. Also consider whether the fabric may relax after washing, especially when the sleeves are heavy or made from a drapey fiber.